Table of Contents
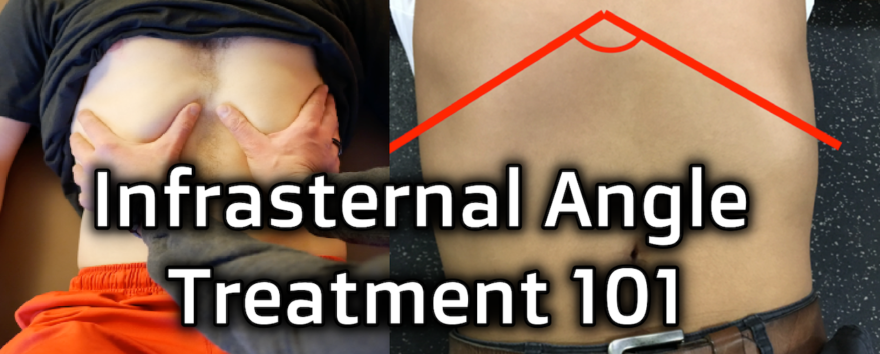
I measured the infrasternal angle…uhhh, now what?
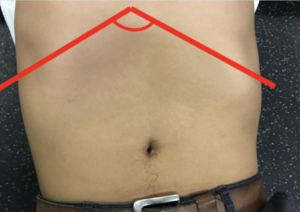
No doubt you’ve heard a bazillion things about the infrasternal angle (ISA). Perhaps you’ve been consistently measuring them and know it’s a big deal.
But you know what we don’t discuss enough about the ISA?
What the hell do you do about it?!?!?
If you don’t know what exercises, positions, and coaching techniques ought to be used, then there is no point in measuring it!
Good news: Making the infrasternal angle dynamic is generally a fairly simple process that involves mastering:
- Pelvis movement
- Breathing
- Body position
Bad news: The coaching side is not that easy
But don’t worry, Movement Debrief Episode 127 will show you:
- The essential ISA exercise progressions
- How to stack
- and so much more
Basically, your peeps ISAs are going to be dynamic AF, ridiculously simple.
Watch the video below for your viewing pleasure, or listen to the podcast audio if you can’t stand the sight of me 🙁
and the audio version:
If you want to watch these live, add me on Instagram.

 t
tShow notes
Check out Human Matrix promo video below:
Below are some testimonials for the class:
Want to sign up? Click on the following locations below:
September 12th-13th, Montreal, Canada (Early bird ends August 16th at 11:55pm!) [6 CEUs approved for Athletic Therapists by CATA!]
October 3rd-4th, Ann Arbor, MI (Early bird ends September 6th at 11:55pm!)
November 7th-8th, Charlotte, NC (Early bird ends October 11th at 11:55pm!)
November 21st-22nd, San Diego, CA (Early bird ends October 25th at 11:55pm!)
February 20th-21st, 2021, Atlanta, GA (Early bird ends January 17th at 11:55 pm!)
May 1st-2nd, 2021, Minneapolis, MN (Early bird ends April 4th at 11:55pm!)
May 29th-30th, 2021 Boston, MA (Early bird ends April 25th at 11:55pm!)
Dickinson College in Carlisle PA (POSTPONED DUE TO COVID-19) [Approved for 14 Category A CEUs for athletic trainers]
Or check out this little teaser for Human Matrix home study. Best part is if you attend the live course you’ll get this bad boy for free! (Release date not known yet 🙁
Here is a signup for my newsletter to get nearly 5 hours and 50 pages of content, access to my free breathing and body mechanics course, a free acute:chronic workload calculator, basketball conditioning program, podcasts, and weekend learning goodies:
[yikes-mailchimp form=”1″ submit=”Get learning goodies and more”]
Bill Hartman – My appreciation for the ISA and much of how I tackle improving ribcage dynamics wouldn’t exist if it weren’t for Daddy-O Pops. Check him out!
Compensatory Movement Patterns – If you want to see how compensatory layers can stack atop one another for either ISA presentation, this is the post to do it.
Effects of posture on chest-wall configuration and motion during tidal breathing in normal men – This article looks at how chest wall dimensions change with supine, sidelying, and sitting. It’s pretty remarkable to see how the rib cage can change.
The hooklying single arm reach is great for narrow ISA presentations who have secondary compensations. The single-arm reach encourages some trunk rotation, which can be a quick hit for both anterior and posterior upper thorax expansion. Check it out below:
If someone is restricted in flexion, abduction, and external rotation measures, the drunken turtle is excellent, especially for narrow ISAs:
The sidelying tilt progression is how I teach wide ISAs how to stack:
The hooklying tilt progression is one variation on how I teach narrow ISAs how to stack:
Interpreting Lower Body Assessments – Want to know how hooklying, Lewitt, and full hip extension change the dynamics of the pelvis? Let’s look at lower body assessments to better understand how various hip positions change pelvic dynamics.
The best exercise positions for infrasternal angles
Question: I was on Bill Hartman’s site and he gave a really general recommendation of starting wide’s in supine and narrows in prone for exercises due to the gravitational effect.
Let’s say I wanted to improve shoulder external rotation for a wide infrasternal angle (ISA), would low reaching for posterior inferior expansion in supine block expansion due to the table?
If the answer is yes, then my question becomes why would wides start in supine if generally trying to achieve inhalation or posterior expansion. Thanks in advance.
Answer: The position you use will totally depend on the compensatory degrees a person exhibits. Let’s break it down into each infrasternal angle presentation.
Wide infrasternal angle positions
In wide ISAs, posterior ventral cavity concentric bias is a primary compensation. This presentation would create limitations in extremity flexion, abduction, and external rotation measures.
For this reason, supine (hooklying in particular) can be effective at teaching the stack. In the supine position, gravity is going to push both the viscera and airflow towards the posterior aspect of the body, eccentrically orienting the posterior ventral cavity.
But what if your client is also concentrically biased anteriorly?
Oh snap fam, now supine can reinforce further concentric bias of the anterior thorax and abdomen. How will you know? When your client tries to tuck, their belly will pooch out or a diastasis recti (bowing out of the rectus abdominis) will form.
Now if you are Eleanor Ripley, you could mostly navigate your way around the alien belly (mostly). But since you are likely not, you are better off choosing a different position to teach the stack.
Let’s keep it simple. Sidelying is the shit when it comes to wide ISAs. I like it because this position compresses the lateral dimensions of the ribcage. It’s also easier to coach tucking because you will posteriorly tilt the pelvis in a gravity-eliminated position.
Wide ISAs = Use sidelying
Narrow infrasternal angle positions
With the narrow ISA, we basically have a flipped situation compared to the wide.
The prone and quadruped positions are great starting points if you client exhibits primary compensations: decreased extremity extension, adduction, and internal rotation. These positions will use gravity to push the viscera and airflow anteriorly, assisting in eccentrically orienting the anterior ventral cavity.
But what if your peep comes in and they throw a ton of secondary compensations in your bidness (aka decreased flexion, abduction, and external rotation)? Now you are potentially driving further concentric bias in the posterior ventral cavity. Jerk move bruh.
For these folks, I dig hooklying. This position biases counternutation (which they need because of the secondary compensation) and pushes viscera and air posteriorly to eccentrically orient the posterior ventral cavity. If this position is challenging, you can elevate the feet a bit to make the tuck easier.

Narrow ISA = Use hooklying
How to coach the stack
Question: What is stacking and what are the keys to making it happen?
Answer: The stack is foundational for improving movement options. It allows for “normalizing” the respiratory mechanism, giving you the potential to have all of your movement options available.
Consider how much of your body is active and influenced by breathing. Like, ALL OF IT. Therefore, stacking well can give you a big bang for your buck movement-wise.
I cannot overstate how important the stack is, especially because most people breeze through coaching this action right. It’s not sexy, but skipping steps will limit the results of the fancier exercises you are programming. It’s why I say:
If you can’t stack, don’t talk to Zac.
And because I’m a hermit…but mostly because of what I said before…Yeah…MOVING ON.
What is stacking? See this official-looking definition below:
The Stack: When the thoracic and pelvic diaphragm are relatively atop one another, allow for noncompensatory breathing to occur.
Conceptually, it looks like this:

In compensatory mechanics, this orientation is difficult to obtain. You’ll look some variation of this:
There are four steps to creating an effective stack, but first, a word of caution:
Do not focus on coaching a later step if your client hasn’t demonstrated competency in a previous step.
Most people will go WAY TOO FAST through these steps, or try to get all steps to happen at once. Be patient, make sure each step looks pretty, and I promise that you’ll see bigger changes in your exercises than you did before.
You’re going the like the way you stack. I guarantee it #Zacswarehouse.
Here are the steps in which you should coach the stack:
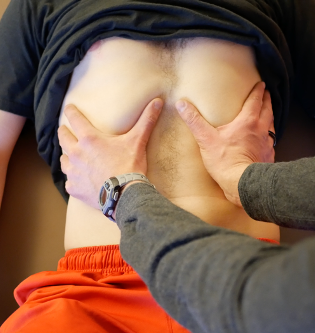
Step 1: The tuck
When building the stack, you’ll start from the bottom of the ventral cavity and work your way up. Think of it like building a skyscraper. You want a solid foundation before adding stories to that puppy. The pelvis is the foundation.
Most peeps in compensatory patterns will have more of an anterior pelvic tilt/orientation. We want to get them out of that position by coaching a posterior pelvic tilt.
You can see what that looks like in this video:
Cues that I like to coach the tuck include:
- Pull your belt buckle to your belly button
- Imagine your back pockets are being pulled towards your knees
- Squish your buttflap/underbutt to your thigh
- Pretend you are a dog tucking your tail between your legs
- Arch your back, now go the exact opposite direction
Ideally, your client will feel glutes and hamstrings if they get it right. Have them rep out a bunch of tucks to really hammer in the concept before moving on.
If they can’t feel glutes and/or hamstrings during the, palpate to see if those bad boys are contracting. If they’re not, you may need to change your starting position.
Here is how you can tell your clients are screwing the tuck up (tucking it up you might say!):
- They have no hamstring or glute contraction
- Their back arches
- Their ab wall pooches out
- Their abs contract like gangbusters
- Their butt stays lower than their back
- Their lower back muscles are SUPER tense and feel like guide wires
Tuck specifics for different infrasternal angle presentations
Aside from the basics mentioned above, you can get a bit more fine-tuned with your tuck selection pending ISA findings.
Narrow ISA: Use 90 degrees of hip flexion and squeeze an object between the knees. Lewitt position is a great place to start.
Here is the Lewitt position:
The above strategy will bias nutation at the pelvis and open the pelvic outlet (aka widen the infrapubic angle [IPA]).
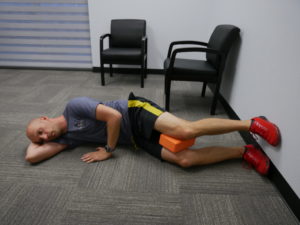
Wide ISA: Use 60 degrees of hip flexion and either hold an object in place between the knees or gently push into a band around the knees. Sidelying is a great place to start.
Peep the sidelying progression below. It’s where I start wides:
The above strategy will bias counternutation at the pelvis and aid in closing the pelvic outlet (aka narrow the IPA).
The above strategies assume primary compensations only. What about if you got someone who has secondary compensations???
Now what you have to do is alter your hip position while respecting the structural presentation. YIKES!!!
But no worries, fam. Ya boi will keep it ridiculously simple for you!
Here’s what I would do if you are dealing with secondary compensations:
Narrow ISA: Use 60 degrees of hip flexion (hooklying), hold an object between the knees.
This strategy will drive the counternutation you need. You don’t adduct in this case because adduction doesn’t correspond with sacral counternutation.
Wide ISA: Use 90 degrees of hip flexion and hold an object between the knees. Lewitt and sidelying are effective.
These strategies will drive some nutation, eccentrically orienting the anterior ventral cavity.
Step 2: The exhale
Channel your inner Whitney Houston party people, because ya boi has been waiting to exhale!
The exhale creates the top part of the stack by maximally ascending the diaphragm.
With compensatory mechanics, the diaphragm is relatively descended. We want to flip the script. To make the desired changes, there are two major keys (cue DJ Khaled):
- Make the exhale as slow as possible
- Exhale as much air out as you can
You’ll know you got it right if:
- the abdominal wall gets smaller uniformly
- Your client either perceives some ab tension or can palpate it
Most people will screw up the exhale by:
- Exhaling too quickly
- Exhaling too forcefully
- Not fully exhaling
- Not maximizing mouth position
You cannot emphasize SLOW enough!
There are some specific tweaks you can make pending which infrasternal angle presentation you are dealing with:
Wide ISA: Pursed lipped exhale. Imagine you are flickering candles or doing an impression of the wind.

This mouth position is useful because a smaller mouth diameter creates some resistance to your exhale. Greater resistance will encourage external oblique activity, which is needed to close the ribcage angle.
Exhaling with balloons, straws, fists, spirometers, and other resistive tools can be effective for this population.
Narrow ISA: Big open mouth exhale. Think fogging up glass, an “ahh” after a refreshing drink, and mouth so big like you are biting an elephant (note: no elephants were harmed in the making of this debrief).

With the narrow, you do not want the external obliques kicking in. This will narrow the rib cage angle even further and reduce full diaphragm ascension. No fun.
An open mouth position will reduce resistance to exhale against, allowing the diaphragm to fully ascend.
Step 3: Controlled pause
Once your client can exhale and feel some ab tension, you are ready to pause. All you have to do for this is:
- Make the client aware of ab tension after they fully exhale
- Coach them to hold that tension and not breathe for 3-5 seconds after the exhale is complete
Your clients will either struggle to keep the ab tension during this portion of the stack or feel like they’re suffocating. In the latter case, this air hunger is due to poor ability to tolerate carbon dioxide buildup.
Don’t worry, I’ve only had two patients die from pausing…KIDDING! Their tolerance should improve with time and practice.
Step 4: The inhale
The last and hardest step is inhaling while maintaining ab tension.
This piece is important because the ab tension will reduce the contribution of accessory breathing muscles with inhalation. These muscles, located mostly in the thorax, lift the rib cage up as a unit. As a consequence, their activity will reduce ribcage expansion.
If the accessory muscles are disadvantaged, the rib cage will expand in all directions, and you’ll see some awesome changes in upper thorax measures.
Basically, NO ONE will mess with you if you can inhale with ab tension.
The steps are basically the same as during the pause:
- Fully exhale and feel ab tension
- Hold the ab tension during the pause
- Keep the ab tension during the inhale
It seems simple enough, but this step is really hard for most people to obtain.
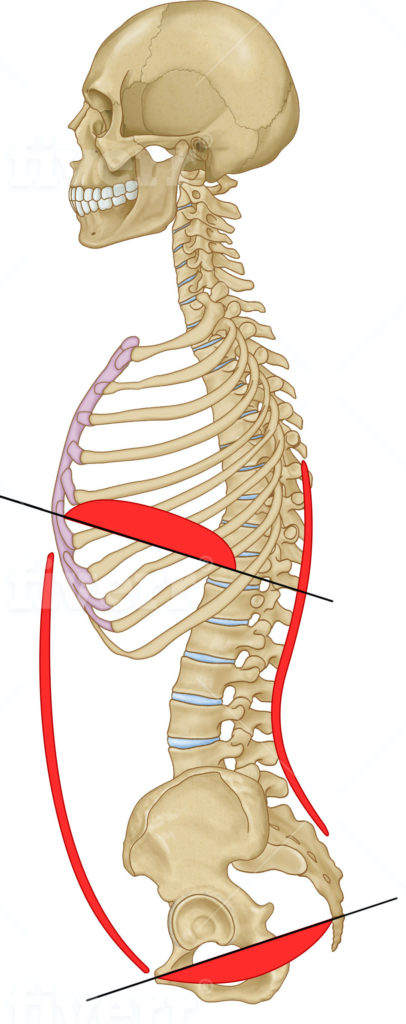
A narrow infrasternal angles’ diaphragm
Question: In someone who’s narrow the diaphragm is stuck so low that it pulls ribs together. So should that person have his ISA even narrower upon inhalation because the diaphragm moves down even further? Typically I can see “narrows” that can expand their bucket handle during inhalation.
Answer: Normally, as the diaphragm descends, the ribs should move outward (aka the bucket handle motion).
However, as the diaphragm descends further and towards flat, its line of pull on the lower rib cage changes. This muscle will actually pull the lower rib cage inward.

Due to the ventral cavity shape of a narrow infrasternal angle, the diaphragm will typically exhibit the latter positioning, contributing to the narrowing of the lower rib cage. This position is further reinforced because now the external obliques have the leverage to develop a concentric bias.
Narrow ISA peeps can exhibit all types of funky compensations:
- paradoxical breathing, where bucket handle movements are flip-flopped during inhalation and exhalation
- Excessive bucket handle movement (usually from pushing the posterior thorax into the ground
- other weird shit
How do you know if what you are seeing is a dynamic ISA vs a dirty cheater? Here are your two tripwires:
- Extremity and axial measures are limited
- They’ll fail miserably at keeping a stack in dynamic movements
If you see either of these two things, don’t let the ISA fool you. They’re compensating alright. Sneaky!
Improving infrasternal angle movements in the obese client and other challenging populations
Question: Had another question for you. What moves do you like for the obese, chronic pain, or non-English speaking clients?
I like a lot of your exercises, but some of these folks seem to struggle with performance or understanding of the exercises. Anything regarding your initial work towards establishing a dynamic ISA would be appreciated. Thanks!
Answer: No doubt, these are some tough cases. Let’s break each one down.
Obese clients
Obese clients are tough because increased visceral fat makes any type of stacking a challenge. What I recommend for this population are the following two positions for improving movement options, mostly because it’s easier to tuck in these positions:
- Sidelying
- Seated
You’ll want to temper your expectations in terms of what movement changes you may elicit with this population. You may not see dramatic changes in mobility, but they’ll often feel better with introducing some movement options.
Also, do not assume that all obese people are wide ISAs. Both ISA presentations can be obese, what usually differs is where fat is carried.
Perhaps the most important factor for improving this population’s movement options: encourage fat loss however possible. If you can reduce visceral fat, then there will be more movement within the ventral cavity available!
Chronic and persistent pain
Much of the rules in earlier parts of this post remain unchanged. You’ll still need to coach the stack and progress physical activity, but you want to progress slowly.
You want to try and avoid flareups if at all possible. 24-72 hours of symptom flareups are generally acceptable, weeks are not. Make sure your patient knows about this.
Generally, I’ll make small changes to the program, and await their response. If favorable, I’ll let them string a few successful days or a week before progressing.
Gotta slow cook the brisket. Once it gets burnt, you need to get a new slab of meat if you know what I’m sizzlin’.
Clients who don’t speak your language
You are eventually going to work with someone who doesn’t speak the same language as you. What in the hell do you do about that?
You still have one language in common: Movement.
These situations are going to be a lot of monkey see, monkey do. You demo what you want the client to do, they repeat.
If your client doesn’t produce the exercise the way you want them to, demo what they did wrong, and show them the correct way.
Other tips that are really useful with this population include:
- Keep the exercises simple
- Learn a few keywords in their language (yes, no, breathing, etc). Not only will this make coaching a bit easier, but it’ll show your client that you care.
Sum Up
- Pending degrees of compensation, start wide ISAs with supine or sidelying; narrow ISAs with prone or supine
- The stack is essential to improving movement dynamics. Sequentially coach the tuck, exhale, controlled pause, and inhale; ensuring that each step is mastered before moving on.
- Narrow ISAs have near-fully descended diaphragms. If you are uncertain if they are dynamics, check how well they can keep the stack in more challenging positions
- For challenging populations, simplify your exercise selection, coach using your body, and go slow.