Table of Contents
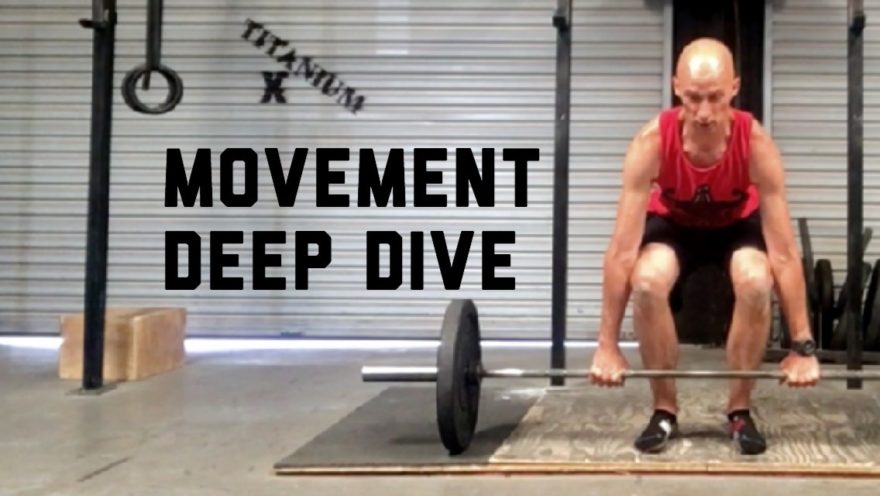
Deadlift – A Total Body Workout
It is hard to find a better fundamental exercise than the deadlift. A time-tested move that ought to be learned by all—whether you’re a professional athlete, bodybuilder, fitness client, or grandma with back pain.
What if you don’t know how to deadlift? Or maybe you just want to get better at coaching it?
You’ve come to the right place.
This “Movement Deep Dive” focuses on the deadlift and all of its variants.
You’ll learn why the deadlift is so important, how to do it progressing and regressing the moven, and how to fix common errors.
So grab some chalk, branched chain amino acids, pen, and paper. This one’s a mother.
If you can’t watch the video right away, I’ve provided a modified transcript below. I would recommend both watching the video and reading the post to get the most out of the material.
Learn on!
Deadlifting Rationale
Hello party people. Zac Cupples here bringing you another “Movement Deep Dive.”
This time, we are going to be pushing away the low intensity activities we’ve been doing in the past. And we goin’ hard. With what you ask?
The Deadlift.
Yes, the deadlift, and all its variants.
It’s an incredibly important activity that I use liberally with my peeps.
Why would you deadlift? I’m glad you asked. Here are a couple good reasons:
- P-Chain Gainzzz
Builds strength and power of our posterior musculature
- Fundamental Movement
We all have to pick stuff up off of the ground
Muscles Active in the Deadlift
To attain greater detail in terms of which muscles are active, we can look at the two big phases of the deadlift:
First Pull

Muscles that are concentrically active include the quadriceps and glutes acting concentrically to straighten the knees.
Second Pull
The glutes and hamstrings are concentrically active during this phase. As we will see below, the hamstrings make a shift towards concentric activity after starting out isometrically active.
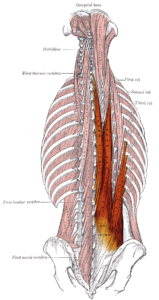
The constant during both phases is trunk position. During the entire lift the trunk is kept in a relatively neutral position. This occurs via an isometric contraction of all trunk muscles, as well as intra-abdominal and intra-thoracic pressure.
Along the posterior aspect of the trunk, we have the erector spinae muscles, which are preventing both falling into flexion and lumbar spine shearing.
If we move towards the front, good ribcage position (i.e. a zone of apposition) is facilitated by isometric abdominal contraction. Taking a breath of air in against this isometric activity allows for 360 degree expansion in both the abdominal and thoracic regions.
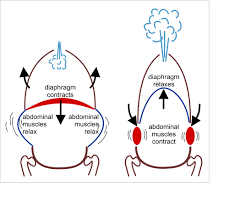
When we inhale, both the thoracic and pelvic diaphragms descend and flatten. When these diaphragms are aligned over each other, the abdominal contents are circumferentially pressed against the abdominal wall, creating multidirectional intra-abdominal pressure. This phenomon enhances lumbar spine stability.
If diaphragms are not over the top of one another, and an individual is excessively in lordosis, the abdominal contents are only pushes anteriorly. Compression on the posterior aspect of the abdominal region (i.e. discs, facets, and spinal nerves) ensues.
Moving upstairs, the two aligned diaphragms are now the thoracic diaphragm and the glottis. Inhalation and descent of these diaphragms allows for the lungs to expand along the entire ribcage—apical, lateral ribcage, and posterior mediastinum expansion. This effect is further enhanced by a valsalva maneuver (i.e. holding the breath against a closed glottis). This strategy protects the thoracic region.
Other muscles isometrically active include those muscules of the shoulder and scapular region.
Depressing the shoulders in a deadlift activates the lats, which helps minimize frontal plane trunk deviations and promotes normal spinal extension. The lower trapezius also activates during this process.
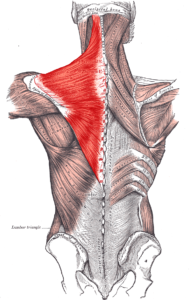
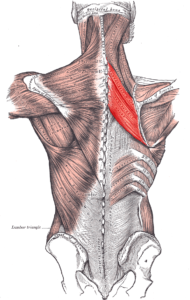
To keep the posterior mediastinum expanded and prevent thoracic hyperextension, the rhomboids contract isometrically to pull the thoracic spine backwards; helping maintain position.
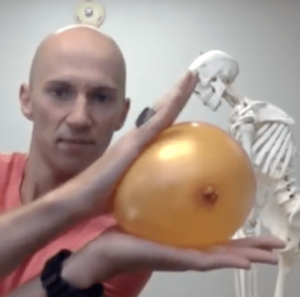
The heavy weight of the bar creates a distractive force on the shoulder joint, acting to pull the humerus out of the socket.
To prevent the humerus from subluxing, the rotator cuff contracts. These muscles act like the Tractor Beam made famous by the Star Wars movies. Much as the tractor beam sucks ships into large Cruise ships, the rotator cuff “sucks” the humerus back up into the glenoid, enhancing stability. Because the cuff encapsulates the entire humerus, there is a circumferential pulling effect from distractive forces.

Therefore, deadlifting activates the rotator cuff in a functional manner.
Maintaining neutral pelvic positioning throughout the lift involves co-contraction of the lumbar erectors, abdominals, and hamstrings. This is especially so during the first pull as we mentioned above.
As the hips translate back during first pull, the posterior outlet eccentrically elongates and stretches. This movement creates a relative internal rotation movement on the femur. Consequently, this movement provides beneficial stretching of the posterior hip capsule and pelvic outlet under load, as well as eccentrically positioning the gluteus maximus to drive the movement.
It is this coordination of isometric and concentric actions that allow force to be translated from the ground-up. That is why the deadlift is so frickin’ awesome, and such a good activity for us to perform.
Who Should Deadlift
Like I mentioned previously, we all have to pick stuff up from the floor. Thus, some variation ought to be included with most everyone.
Putting the Deadlift in Your Program
For me personally, the deadlift is a prime movement for early-stage rehabilitation processes. It is often the first loaded activity I teach my patients.
Early rehab phases teach sagittal plane control and restore mobility in the frontal and transverse planes. The deadlift achieves all three of these goals. In the former, deadlifting teaches one to extend his or her body without falling into excessive extension, a normal protective response our body has.
As for the latter, the posterior weight shift that occurs in the deadlift acts to stretch out the tonically active frontal and transverse plane muscles of the posterior outlet.

As we move along towards the performance side of things, deadlifts are great for high days. It should be one of the first activities performed, since it is a total body movement.
Now some people may squat on the same day that they deadlift. On these days, it is recommended to deadlift after squatting. The reason for this order is because the deadlift can be quite taxing to the trunk musculature that stabilizes the spine. We do not want these muscles fatigued when we are axially loading the spine, which occurs in the squat.
I personally don’t do this much anymore.
Loading Parameters
There are several ways we can load the deadlift
- Heavy
I like to make this sucker heavy early on. I have all my grannys pull my 62# kettlebell from the floor, and they do so masterfully.
We want heavy because the deadlift loads posterior musculature quite well.
Typically, I keep the rep ranges under 5. For some reason, it feels weird to deadlift above 5 reps (isn’t that called cardio?). Sets will range from 3-8.
- Fast
This method is championed by Westside. Pulling a lighter weight fast is a great way to train both fast twitch muscle fibers and technical aspects of the lift.
I keep my reps typically here 2-4, performing 5-10 sets.
- Concentric-only
This method is phenomenal for in-season athletes, as it takes out the eccentric stress that can impair recovery.
I keep the reps low (5 or less) and the sets around 3-5.
- Slow
Some people will use the deadlift for tempo work. I am personally not the biggest fan of this unless we are using a trap bar or RDLs. The deadlift is just too technically demanding and intense for maintaining trunk position. These muscles will fatigue quickly.
If you want slow twitch hypertrophy, I’d rather some RDL-variant. You can even use wrist wraps for this. I won’t judge.
Deadlifting Assessment
Before choosing which deadlift variation you should use, there are a few assessment pieces that can help guide you one direction or the other.
- Hip Rotation
- Functional Squat
- Arm Length
Let’s look at each.
Hip Rotation
- Sit on a table with feet dangling
- Hips and knees near 90 degrees
- Keeping the knee centered, move your foot outward to check internal rotation
- Normal range of motion is 40 degrees
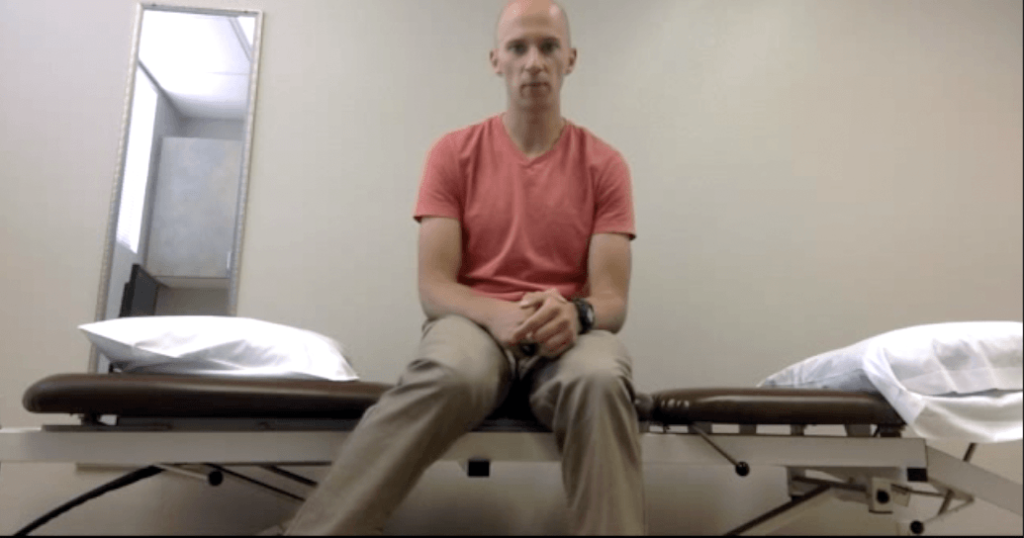
- To check external rotation, keep the knee centered and move the foot inward
- Normal range of motion is 45-60 degrees.
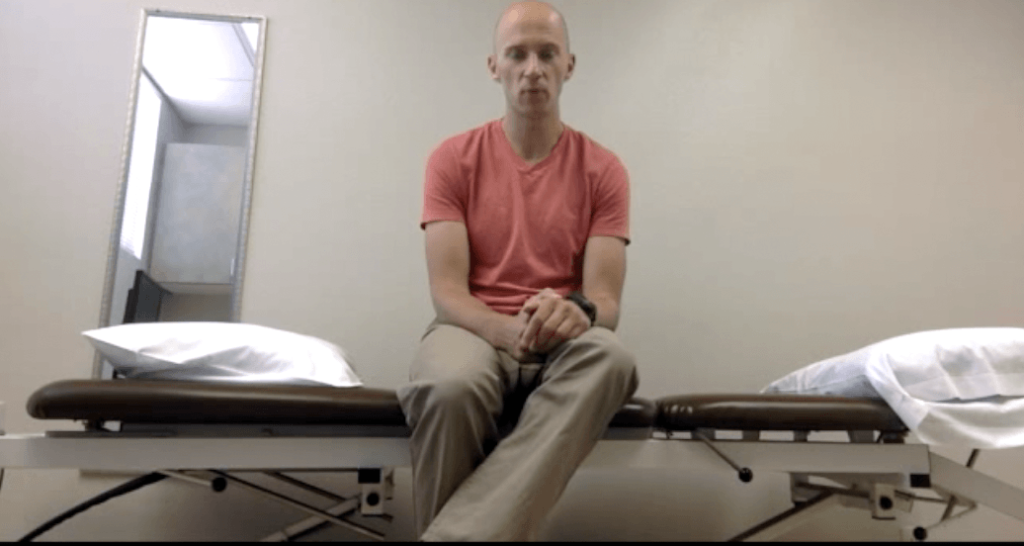
In the conventional deadlift, the femur position requires a bit more internal rotation, whereas the femurs are more externally rotated in the sumo deadlift.
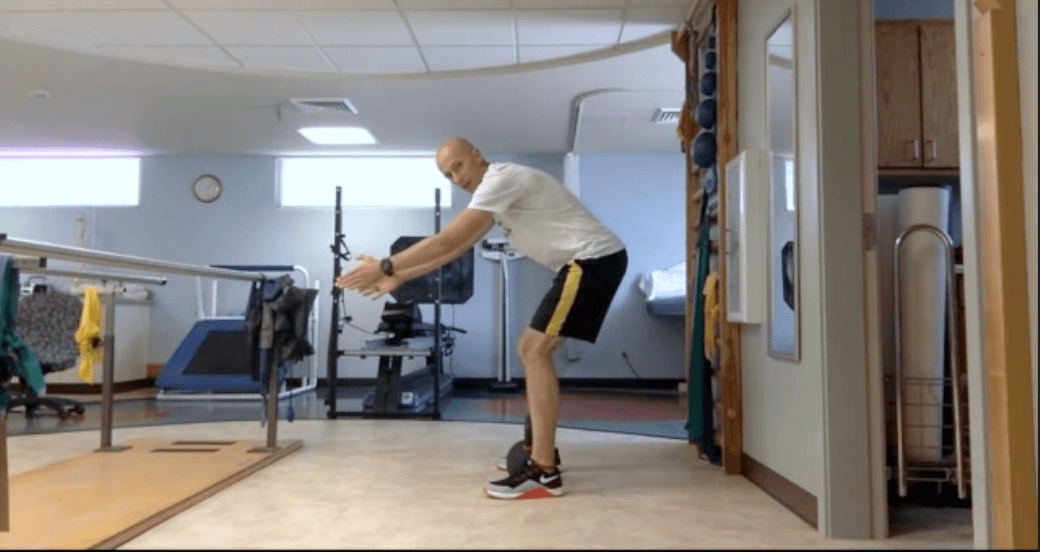
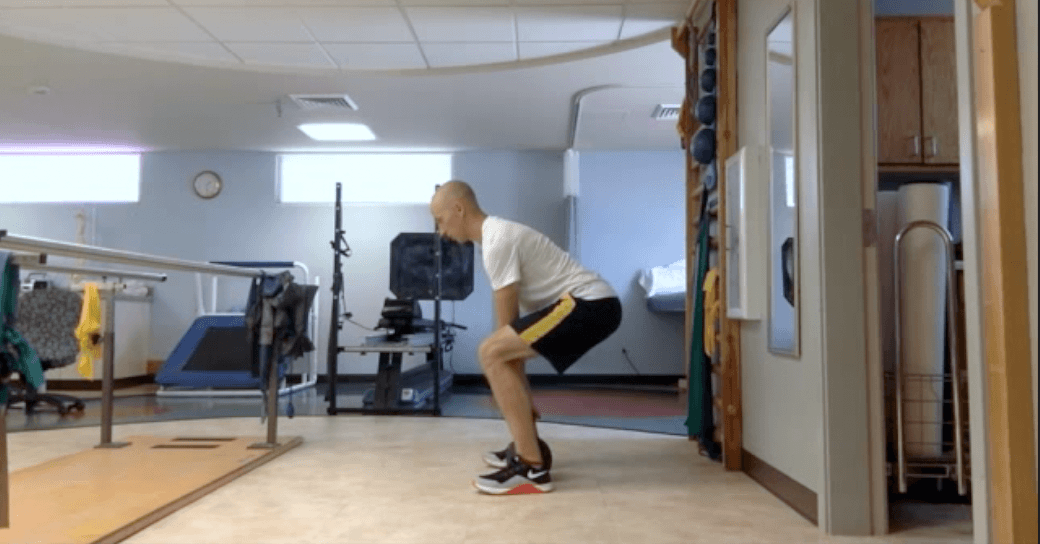
Functional Squat Test
This test looks at posterior outlet mobility, indicating how well you can posterior weight shift.
Here is a video below scoring the functional squat.
If you score a 3 or better, you would probably do well at conventional deadlifting. If you are less than a 3, you might consider pulling sumo.
Arm Length Test
This test is pretty simple. Just stand at ease and measure where your arms are in relation to your greater trochanters (those are the bony promineces on the side of your thighs).
If your arms go way past your greater trochanters, you are probably born to pull conventional. Long arms can make up for hip mobility limitations.
If you have shorter arms and a tiny torso, you may want to go with sumo. This variation shortens how far your legs have to travel downward.
To recap these tests.
Pull conventional if:
- Hip IR > Hip ER
- Functional Squat >3/5
- Long arms
Pull sumo if:
- Hip ER > Hip IR
- Functional Squat <3/5
- Short arms and short torso
If you fit in the middle, you may be able to do both variations. You’ll just have to play around and see what fits best.
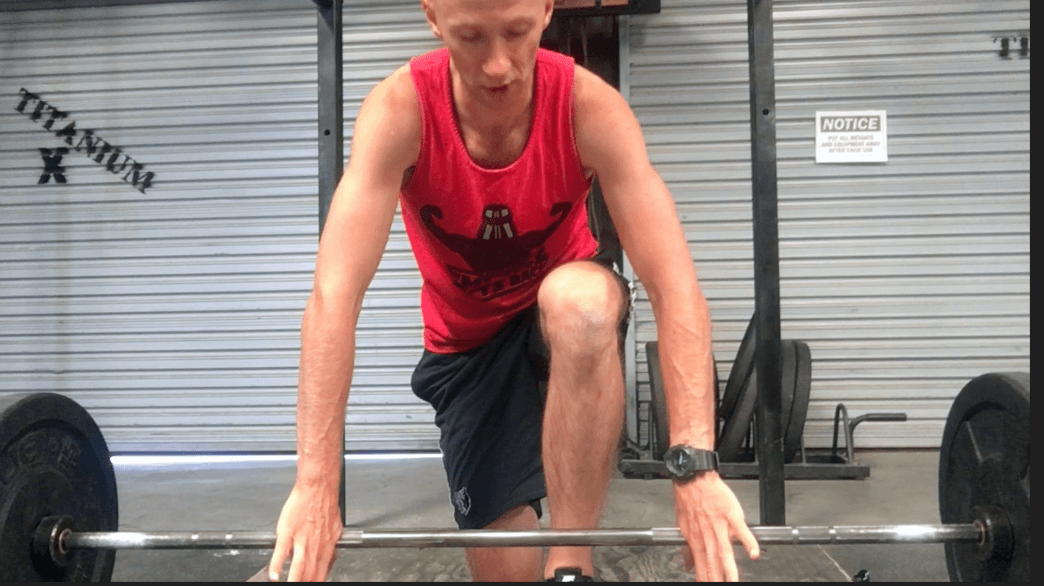
Performing the Deadlift
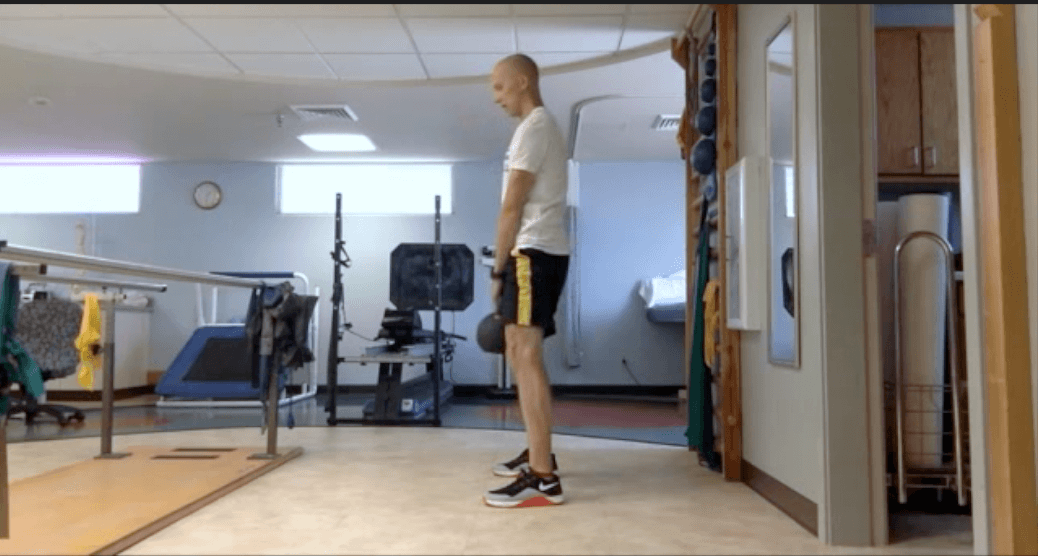
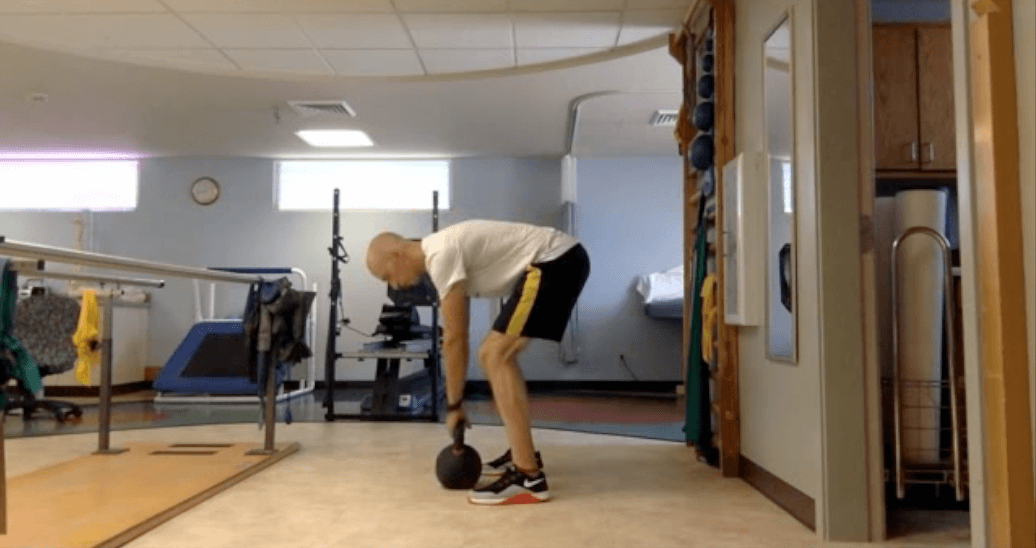
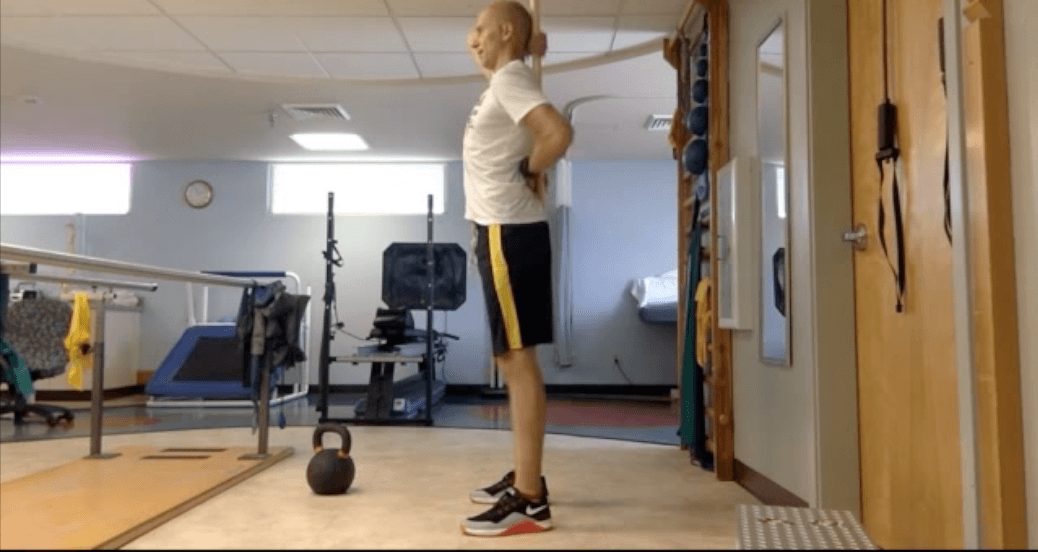
I typically don’t start my peeps right off the bat pulling the bar. A great variation to start with involves the kettlebell.
Let’s check it out.
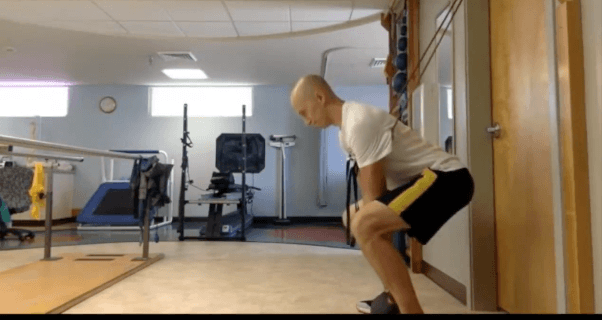
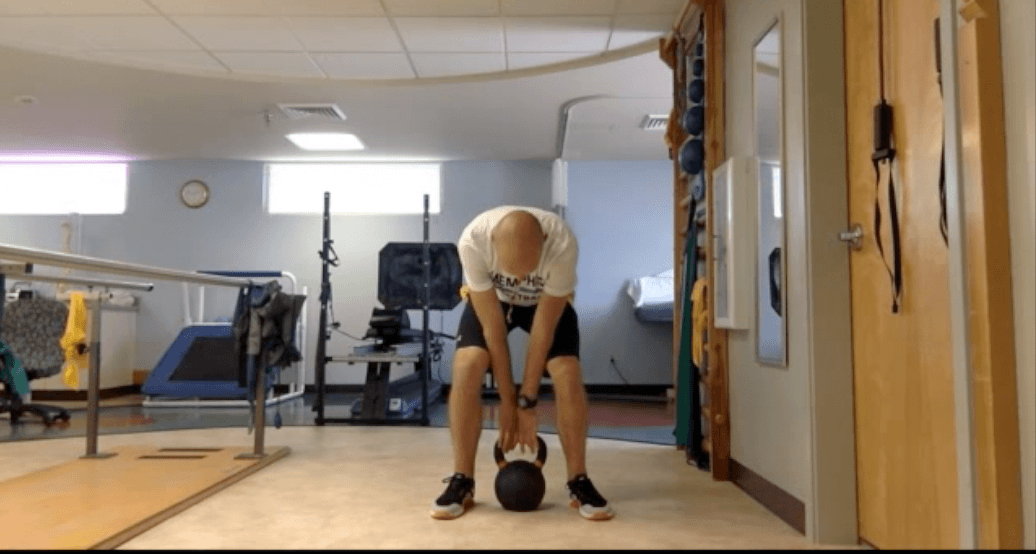
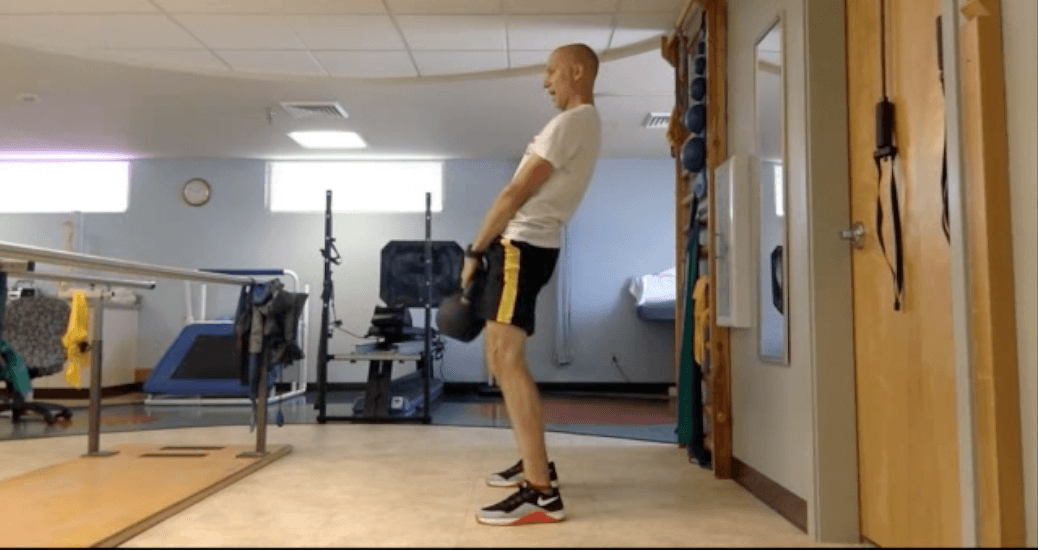
Kettlebell Deadlift
This deadlift is the easiest to teach hip hinging. Here is how I set it up.
- Set the kettlebell directly between your legs
- Feet should be slightly toed out
- Let out a full exhale to drop the ribcage
- Simultaneously reach forward and push the hips backward, as if you were getting karate chopped in half or opening a door with your butt
- Drop the arms close to the body towards the kettlebell
- Squat down until you grip the kettlebell; gripping the snot out of it.
- Sit back, feeling the hips engage
- Pull the shoulder blades down towards the hips
This setup ensures that the weight is posteriorly shifted, the ribcage and thorax are in a good position, and the spine is stable.
As mentioned before, the pull is broken down into two phases.
First pull should involve the following:
- Squat the kettlebell up to mid-shin

The second pull should involve the following:
- Push the hips forward and through into the kettlebell
When lowering the weight back to the ground, the phases of the pull are just reversed.
- Push the hips back, keeping the weight close to the body
- Act as if you are setting the kettlebell behind you
- Squat the weight down
The weight is kept as close to the body as possible to minimize the moment arm, or the distance, from the kettlebell to the hips.
If the moment arm becomes too great, the hips become mechanically disadvantaged to lift the weight, and the lower back instead becomes the primary mover.
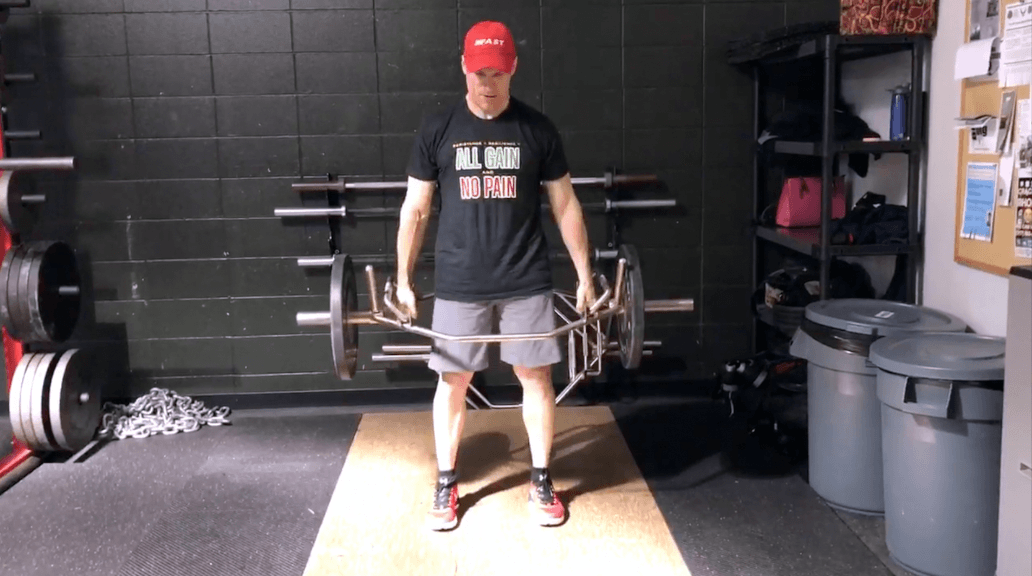
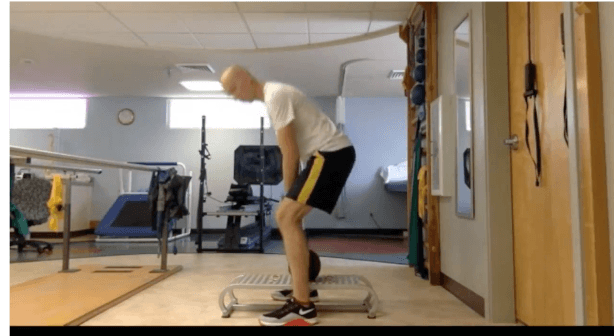
Trap Bar Deadlift
Once you’ve mastered the kettlebell deadlift, it’s high time to pull some heavy shit off the ground.
First thing I’ll go to is the trap bar deadlift. Not only is it typically higher up than a straight bar, but it’s a nice hybrid between a squat and a deadlift. These qualities make it great for people who struggle with depth, as well as those with ankle mobility limitations.
The steps are very similar to the kettlebell deadlift, only I’ll cue a few extra things.
Here is my pops, Bill Hartman, demonstrating the trap bar deadlift:
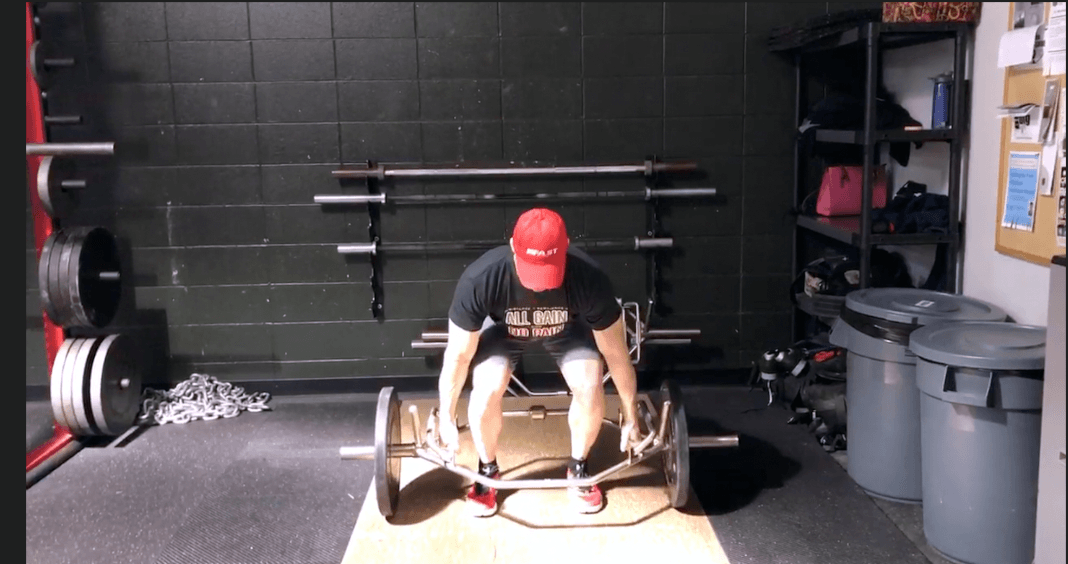
- Feet hip width apart
- Pushing the ground/paper towel apart to drive the hips
- Squat up, hips forward
Here’s a view from the side. Setup first:
Notice how Bill’s shoulders are pulled downward to help with the posterior weight shift.
And here is the finish:
Straight Bar Deadlift
Now we are on to the good stuff.
Before going over conventional and sumo, let’s look at a couple commonalities.
Gripping the Straight Bar
Though different lifts, gripping is quite similar between conventional and sumo deadlifting.
The bar should be gripped just before the fingers, where calluses typically form.
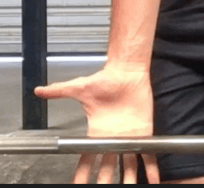
You don’t want to grip in the center of the palm. As the weight gets heavier, the bar will tend to slide down the hand. This can throw you off in the middle of a deadlift.
If you start at the lowest point the bar can go at the hand, then the bar will simply fall out of your hand if you miss the lift.
The other benefit of this grip location is you will not have to pull the bar as far of a distance, and subsequently won’t have to set up so deep.
In terms of arm position, I initially recommend an overhand grip on both arms. This grip style keeps the arms and trunk symmetrically loaded, and is a great challenge for improving grip strength.

I will stay at this grip as long as possible. If I am progressing up in weight, and grip is my limiting factor, I will chalk up my hands to get a few extra pounds. (you can check out a solid post on chalk here.)
It is only once I’ve exhausted these options that I’ll switch to an alternate grip.

I put using this grip off because of the risk of bicep tendon irritation (and potential tear) and the induced trunk asymmetry.
If you are going to use this grip, I would make sure you alternate.
Regardless of your grip style, there is a great way to increase trunk and grip stability by grabbing the bar in a particular way.
I start the grip by first internally rotating my arms, placing my hands’ web space into the bar.
As I wrap my fingers around around the bar, I will act as though I’m trying to bend the bar. This creates shoulder and scapular external rotation, further enhancing body stability.
This cue will help reinforce posterior weight shifting.
Deadlift Bar Selection
I would also recommend getting a deadlift-specific bar. These bars do not have knurling in the middle, are thinner, and and bit bendier.
We want these qualities in a bar to lessen grip demands.
Deadlift Shoes (or Not)
I’m personally a shoeless deadlifter. The reason why I like no shoes or minimal shoes is because these choices bring me closer to the ground, minimizing the distance I have to pull the weight. Chuck Taylors are also a good choice (go with red, trust me).
Breathing During the Deadlift
As the weight gets heavier, the Valsava maneuver becomes critical for enhancing stability. Here’s how to do it:
- Exhale to drop the ribcage
- Inhale through the nose at the top
- Get set up at the bottom
- Take another breath of air in through the nose
- PULL!
I don’t advocate inhaling through the mouth because you will lose ribcage positioning, and subsequently lose 360 degree intra-abdominal and intrathoracic pressure.
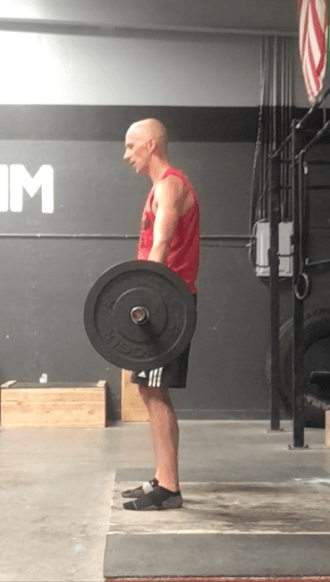
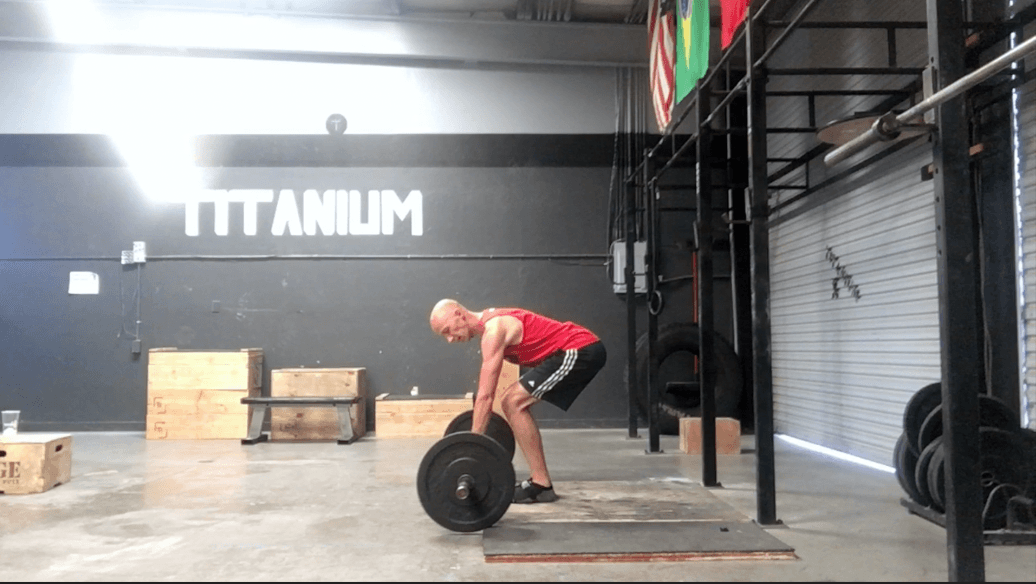
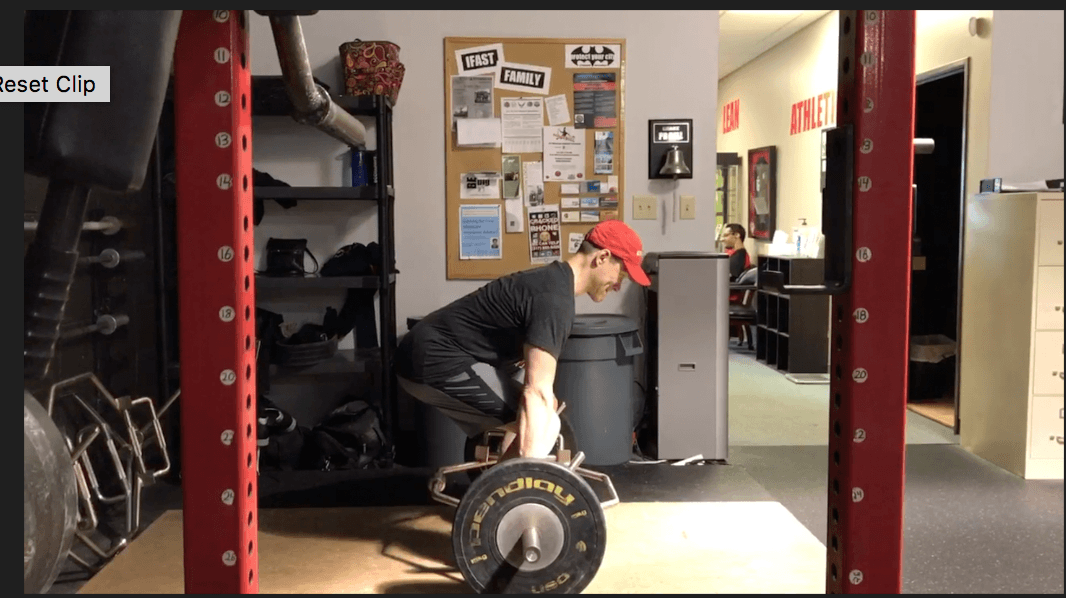
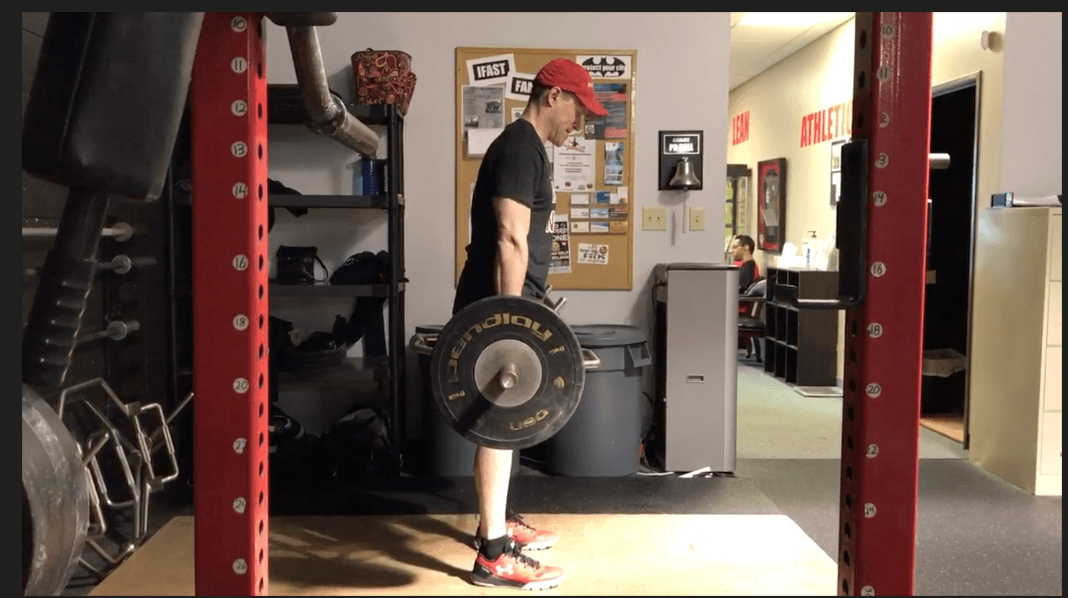
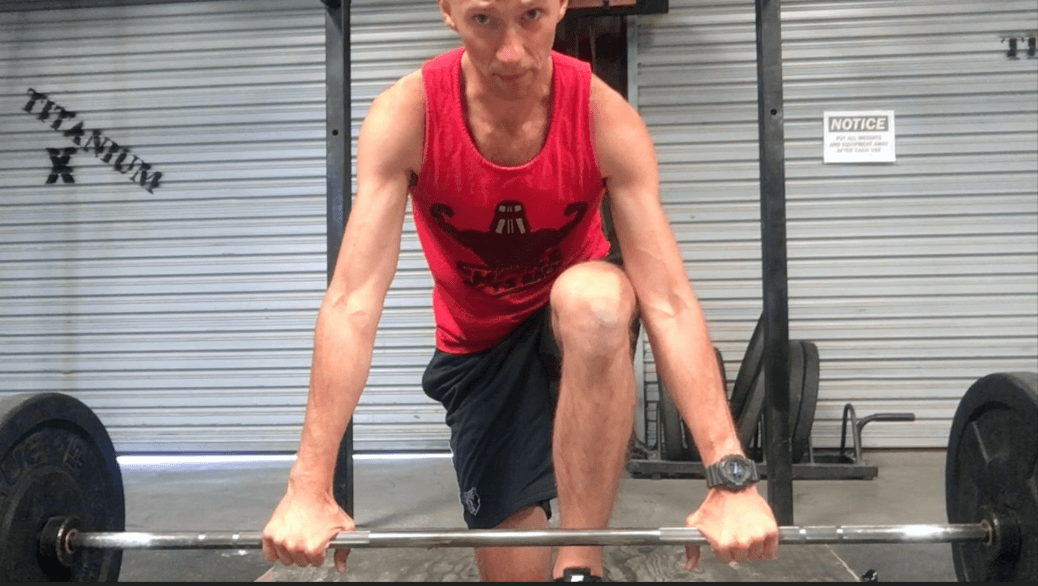
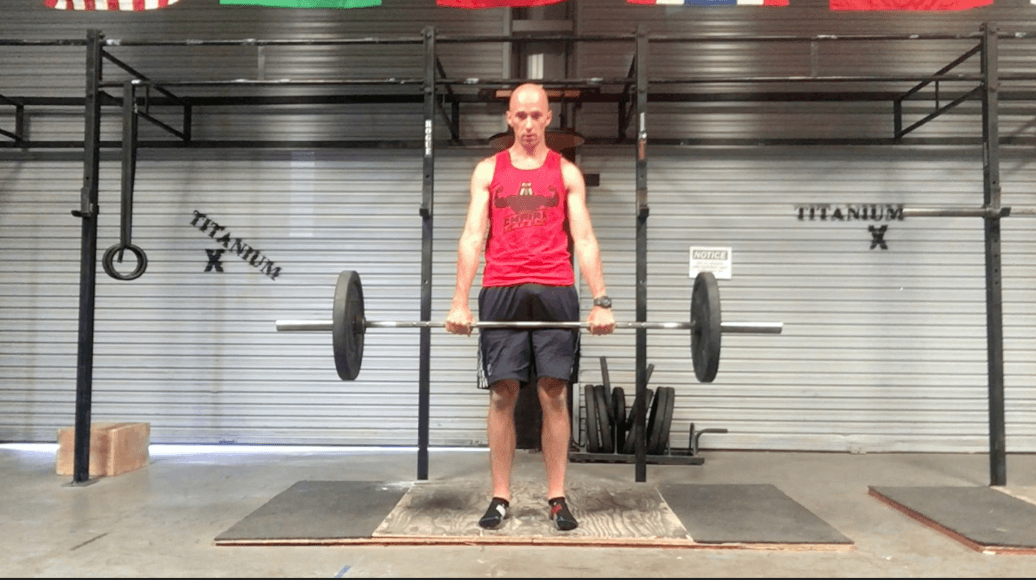
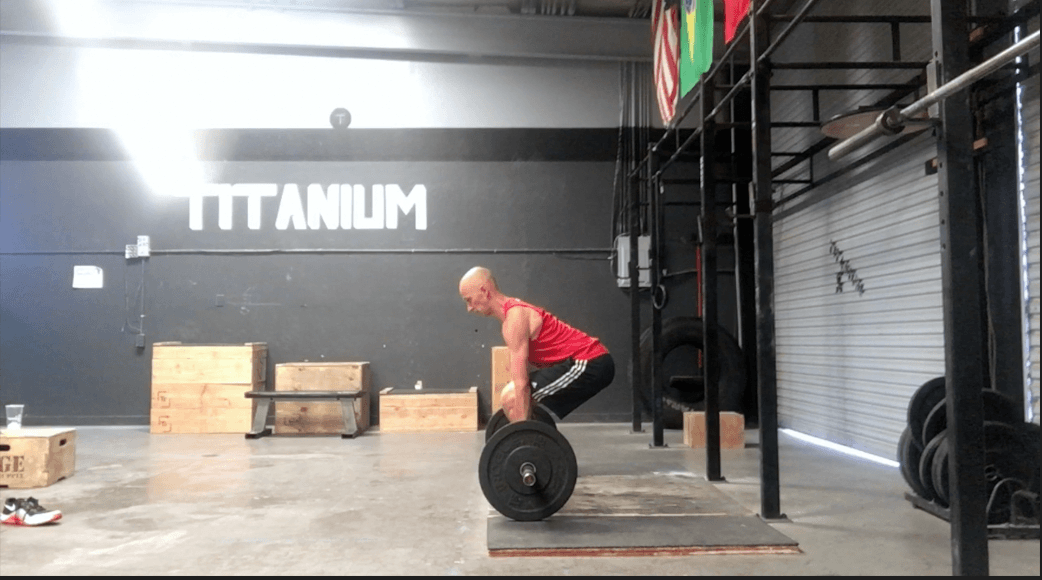
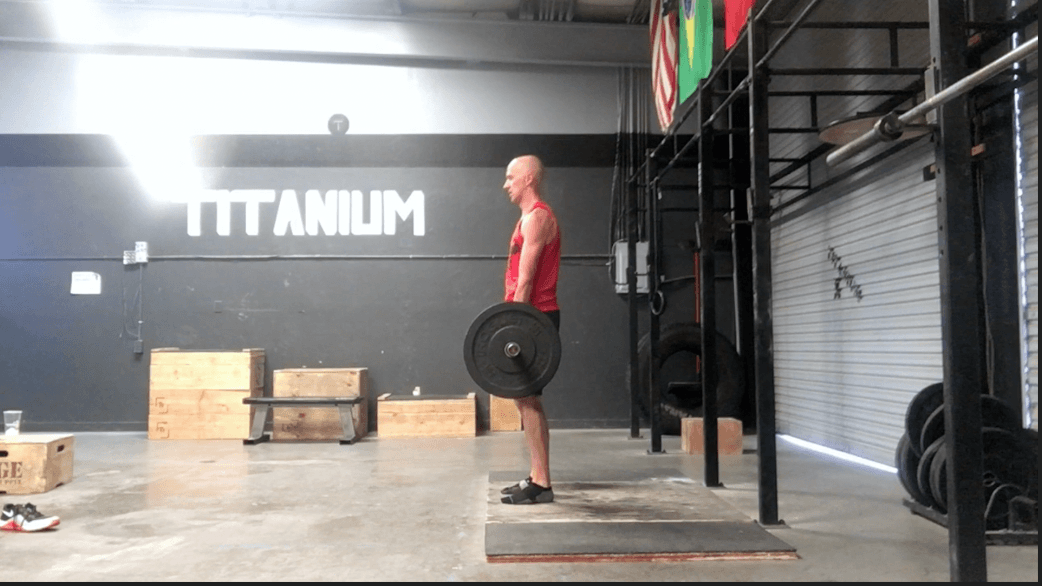
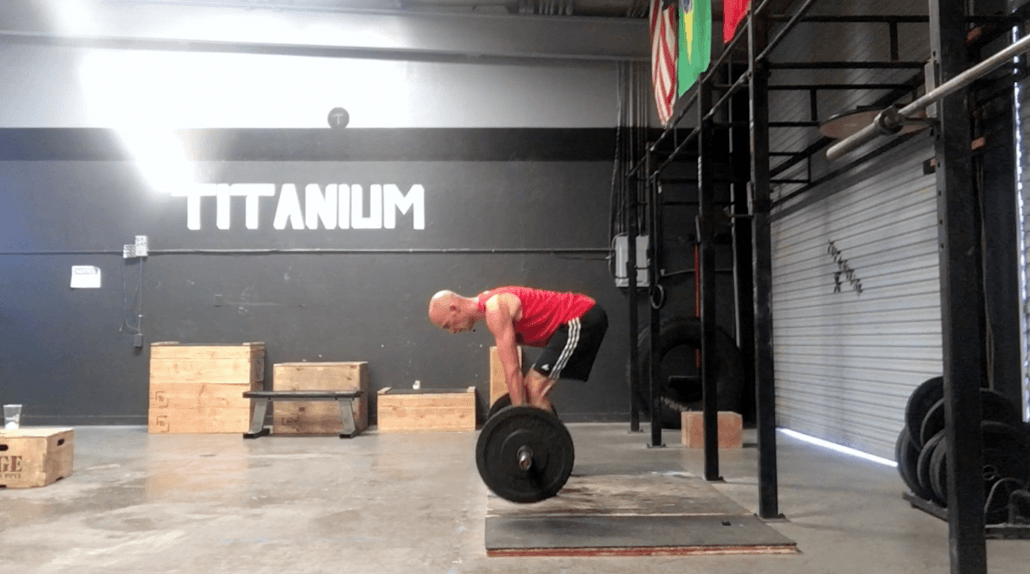
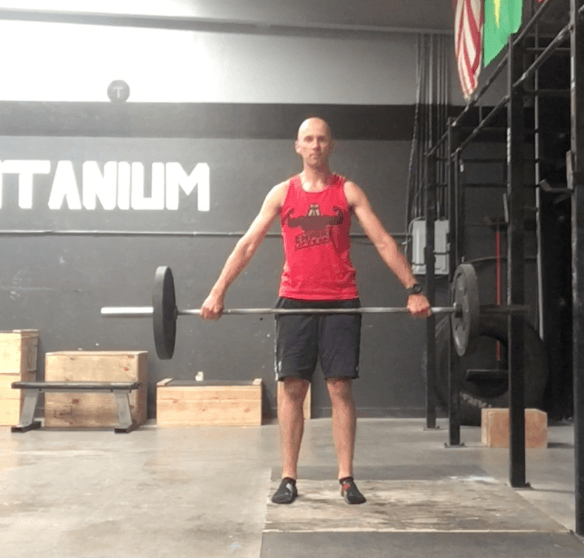
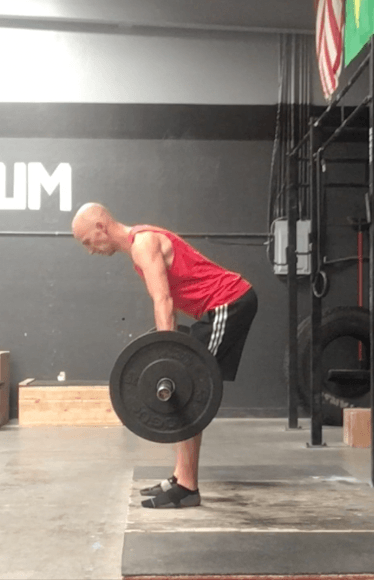
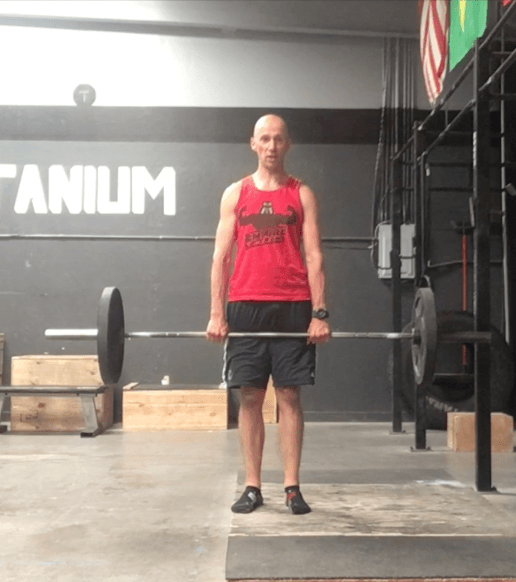
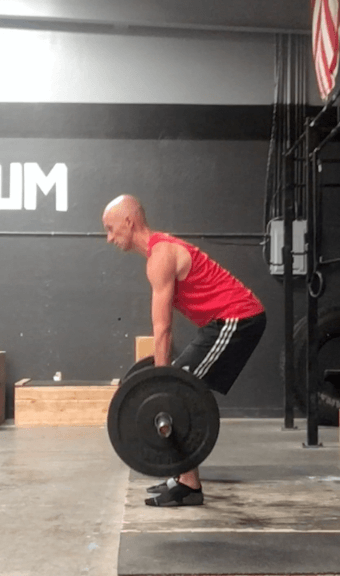
Conventional Deadlift
Let’s look at the setup for this move.
- Stance is narrow. Try to keep feet within the knurling
- Slightly toe out
- Hands are just outside the feet
- Dial the feet out/rip paper towel apart
- Exhale to drop the ribcage
- Reach forward, hips back
- Bend the bar
The finish is the same. Squat it up, hips forward.
And here are some side views. First, the set up:
Then the finish:
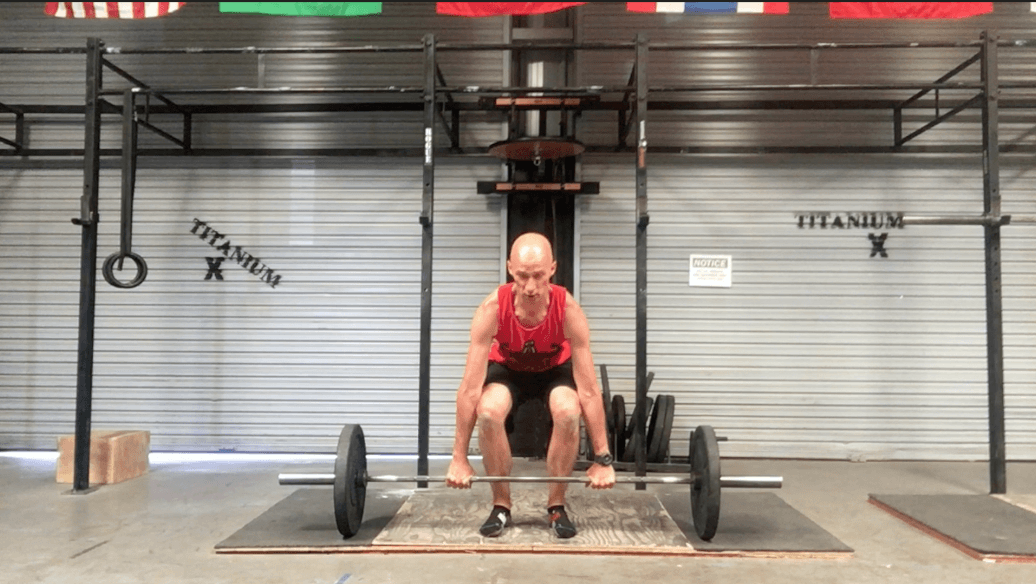
Sumo Deadlift
The setup is fairly similar to the conventional with a couple differences in setup.
- Stance is wide with the toes out (shins around rings in knurling)
- Hands are shoulder width apart
- Rip the ground/paper towel apart
- Exhale and drop the ribcage
- Reach forward/hips back
- Bend the bar
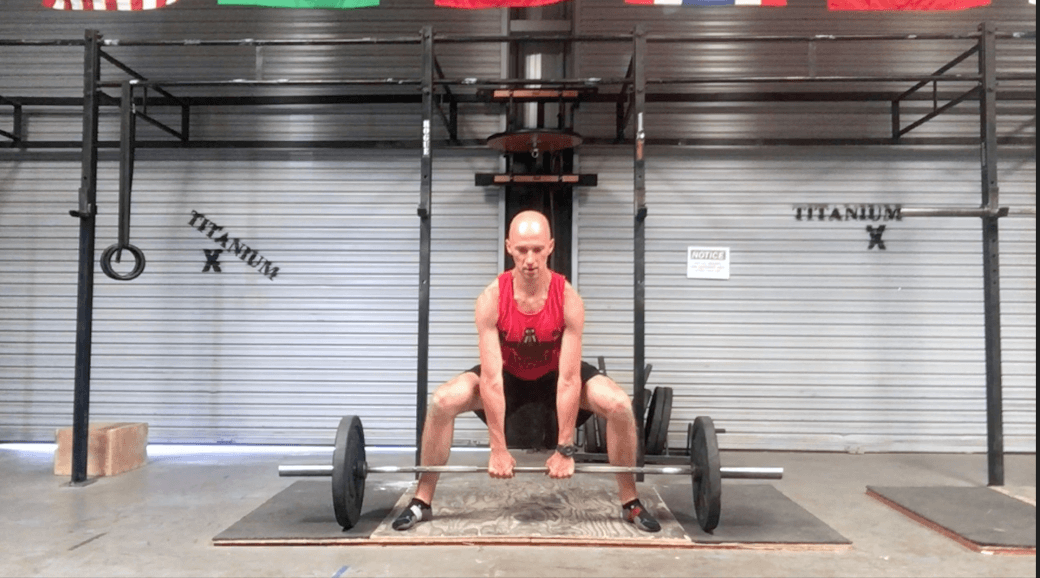
And our classic finish, squat it up, hips forward:

Deadlifting Errors and Mistakes
Yes, you and your peeps will inevitably may make a few mistakes along the way.
Here is your guide to fixing them.
Excessively Arched Lower Back
The fix: The ribcage
Fix this arch by exhaling to drop the ribcage. This will reduce lordosis. If you throw in the reach at the beginning of the lift, it becomes very challenging to arch.
During the hinging portion of things, instead of telling these people to sit the hips back, ask them to either:
- Fold in half
- Take a bow
- Smash their face onto a table
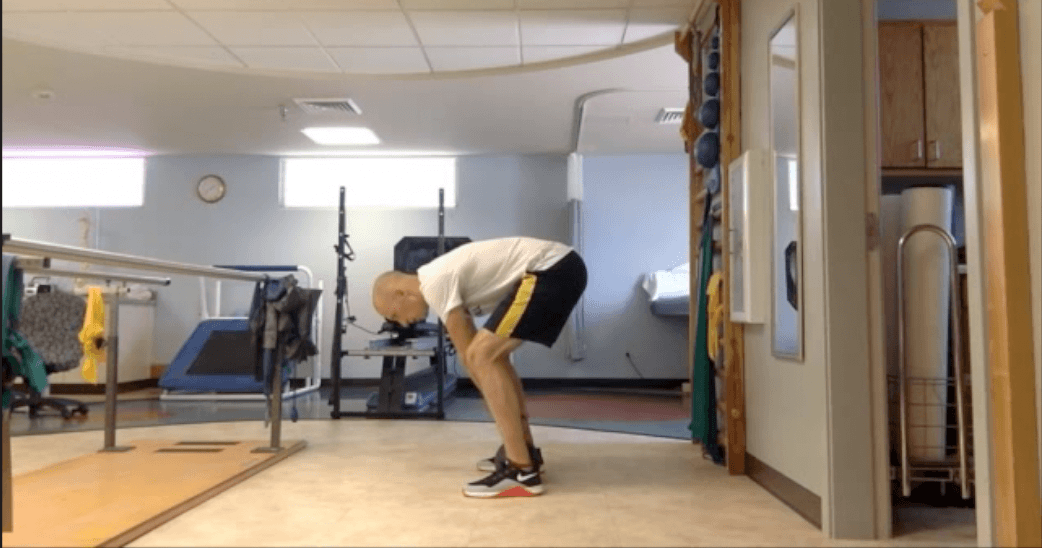
Excessively Rounding the Lower Back
The Fix: Hips Back
I will either give them a target to push their hips into, or channel the “watch my fanny guy” from Scary Movie 2 (one of the greatest comedies of all time).
Scapular depression can also get appropriate thoracic extension. Sometimes just providing a tactile cue to depress the shoulder blades can do wonders.
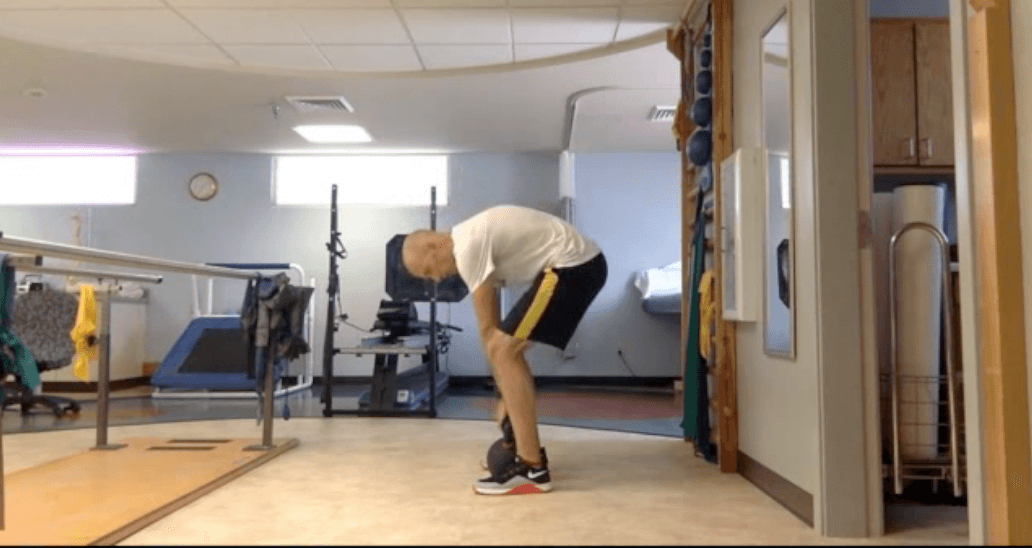
Not Sitting Back Far Enough
The Fix: For the love God sit back
This error is problematic for one who cannot express flexion mobility such as a normal straight leg raise or toe touch. When the hips run out of room, the lumbar spine finishes the job. This position also reduces the hamstring’s isometric influence on the pelvis. Extension increases to enhance stability.
To fix, you can use the scapular depression cue, manually drop their hips, or have the client grip the weight and start to fall back. If the weight is heavy enough, they shouldn’t actually fall back. You want the sensation that if you were to let go of the weight that you’d fall backwards.
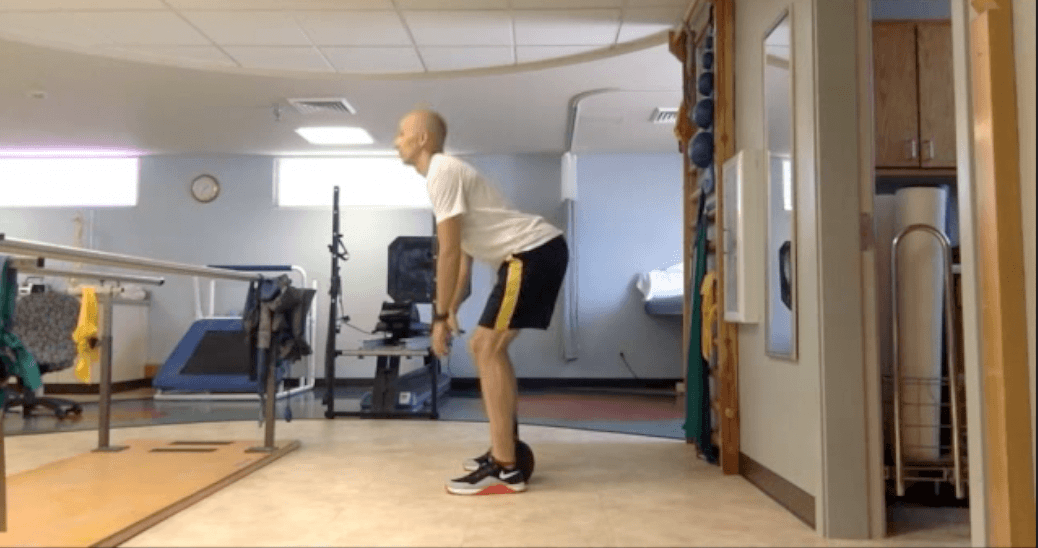
Faulty Neck Position

The Fix: Eyes down
This move is a no-go because this positioning throws you out of a neutral spine position.
If I were to upright myself in this posture, here’s what I’d look like:

When cervical extension is increased, the thoracic and lumbar curves are pushed further into relative extension since the spinal column moves as a single, fluid unit.
That being said, I don’t necessarily want to pack the neck either, because that also can negatively influence spinal curves.
Neck packing reduces normal cervical lordosis, subsequently reducing normal kyphosis in the thoracic spine, and lordosis in the lumbar spine. It also closes off the airway.
Instead, we want to keep the head in a neutral position, and maintain it the whole time. I’ll just cue clients to look at the floor. I may have them keep looking at the floor until they can maintain neutral head position at the bottom, as this position is more dangerous.
Once you have good head control, you can increase extension-based forced production by driving the eyes upward. Head position MUST be maintained during this though.
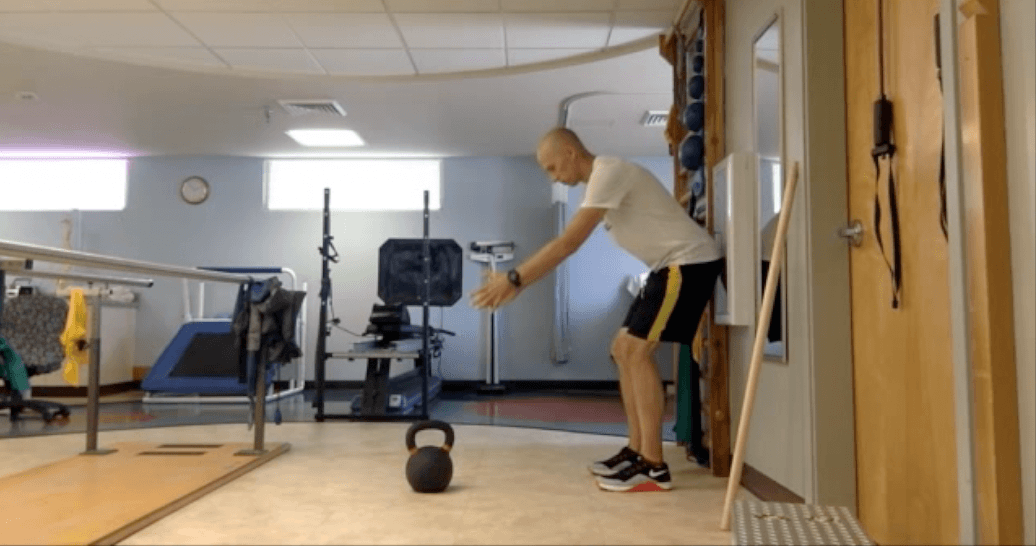
Weight Drifts Away from the Body
The Fix: The lat lock & keeping the bar close
The bar ought to be pulled in the straight line to keep the weight close to the hips; minimizing the moment arm. The hips are the primary drivers.
If the weight is farther away from the hips, the hips cannot effectively drive the weight upward, and the back must take over.
Getting a lat lock mitigates this issue. Cue them to drop the shoulders down and keep the weight or bar close to the body. A Gray Cook band placed in a door can be used to lock the lats effectively. Just put the Cook band between the arm pits and hold it in place.
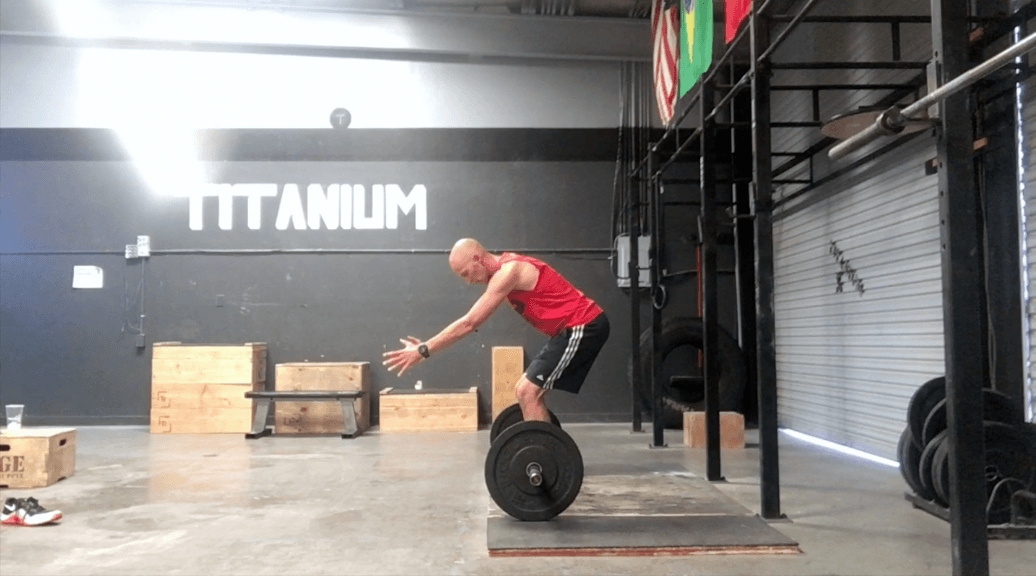
Valgus Collapse at the Knee
The Fix: Ripping paper towels
Valgus is occurring on the left knee in this photo.
What I do to fix this is tell the client to imagine a paper towel underneath his or her feet. They will want to try and rip that paper towel apart. This will create supination at the foot and hip external rotation. You can also say to spread the floor apart or twist the feet. This will minimize valgus collapse.
Hips Rise too Early
The Fix: Slow Pull
This error indicates inability to use the glutes to push out of the bottom; substituting with lower back.
I fix this by telling clients to pull the bar slowly from up to mid shin, then cue them to drive the hips forwards.
If the slow pull doesn’t work, tell the client to immediately drive the hips into the bar as quickly as possible.
It could also be a setup problem. Ensure that they have sat far enough back.
If none of these cues seem to be working, you may need to elevate the weight from the ground, either with boxes or a rack pull.
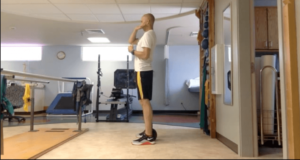
Poor Finish
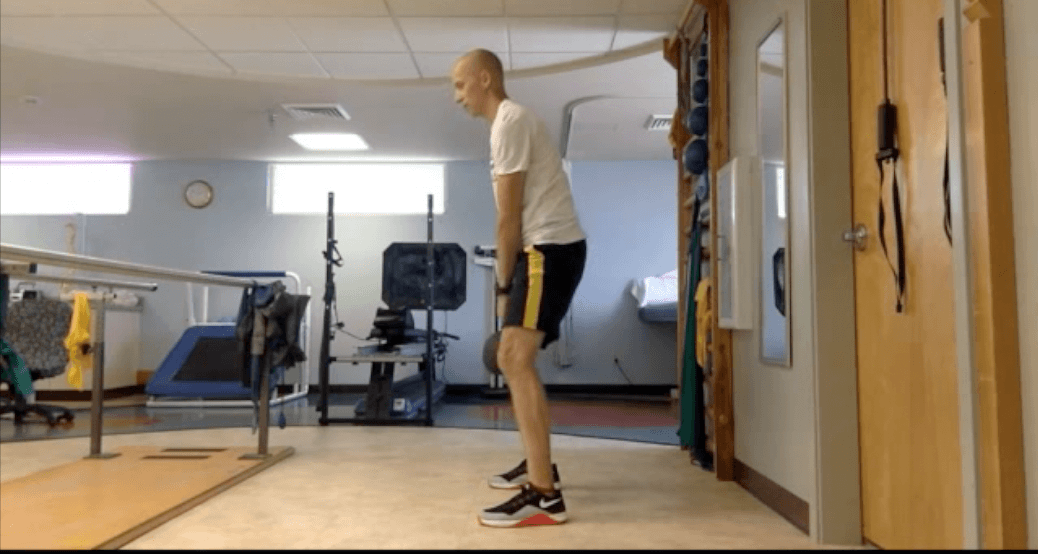
The Fix: Be tall
Undesirable because you are not achieving true hip extension.
I’ll cue them out of this by telling them to finish tall or hump the kettlebell.
The Overzealous Finish
The Fix: Channel Michael Jackson
Undesirable because you are not achieving true hip extension. We want to teach them to posteriorly pelvic tilt at the top. So I’ll cue “hips up” as opposed to hips forward. Of course the classic Michael Jackson impression cue works great as well.
Deadlift Regressions
If you have someone who cannot lift a weight from the ground, elevate the weight. Elevation minimizes how much posterior weight shift must occur. This variation is great for hypomobile people.
If elevating doesn’t work, perhaps you may just work on the hinging portion of the movement. I’ll use a wall as a target for a person to hinge back to.
You can help the client shift back by pushing them back via the crease of their hips.
Be careful of people reaching their arms upwards, this will promote extension. Cue people to reach down.
A regression I don’t like is the dowel hip hinge.
I would argue the spine is not neutral with this regression. If I’m placing the arms in a position that drives thoracic extension, and someone has shoulder mobility limitations that would compensate with further extension, I will hinge in an excessively extended position.
RDLs
Let’s say you don’t have access to kettlebells and you still aren’t ready for a trap bar or straight bar deadlift.
Here is where RDLs shine.
The first progression I go with is a snatch grip RDL.
The wide grip forces a bit more thoracic flexion, which will limit spinal hyperextension. Grip at the farthest knurling possible.
The setup is the same as a conventional deadlift, though for this movement you start with the bar in the air.
- Narrow stance
- Tear paper towel apart
- Bend the bar
- Exhale to drop the ribs
- Slide the bar down the thighs as the butt goes back
- Face smashes a table
- Hip forward to finish
Once the snatch-grip has been mastered, then you can switch to a conventional RDL grip.
This variation is more challenging because the lower traps and rhomboids cannot hold the thoracic spine as well into appropriate flexion.
The performance is the same as the snatch grip RDL
Partial Deadlift from the Bottom
Though elevating is a possibility for an early hip riser, what if someone has the mobility to get into the bottom of a deadlift but lacks strength at that range?
Simply repping out first pull could be a great way to build strength out of the bottom of the pull.
Sum Up
We did it.
We made it through this week’s “Movement Deep Dive” on the deadlift. I hope you got a lot out of it.
Here are the big keys:
- The deadlift is a great total body movement for just about everyone
- Teaches appropriate extension, spine position, and stabilization strategies
- Setup emphasizes a posterior weight shift
- First pull is like a squat
- Second pull drives hips into bar
- Reverse it on the way down
- Mobility and strength dictate which is the best version for you
Do you have any questions, takeaways, or cues you like for the deadlift? Go ahead and comment below. We’d love to hear you.
Recommended Relevant Resources
Mike Robertson’s Deadlift article
Photo Credits
Häggström, Mikael (2014). “Medical gallery of Mikael Häggström 2014“. WikiJournal of Medicine 1 (2). DOI:10.15347/wjm/2014.008. ISSN2002-4436. Public Domain.