Table of Contents
An underappreciated kettlebell exercise
The kettlebell armbar is a vastly underrated move for improving your range of motion, strength, and stability in your upper body.
The reason why it’s underrated and underutilized is because it’s quite unclear when to program this activity and how to execute it most effectively.
We will change that with today’s post.
Check out the video and post below to take your armbar to the next level!
Why program the kettlebell armbar?
The kettlebell armbar is an incredibly versatile exercise for enhancing shoulder and thorax mobility, as well as working your shoulder like whoa!

In fact, I think the armbar is the best starting move when teaching someone to perform any type of pressing. The reason being is that performing this movement well encourages an effective starting position that is needed during any press.
It’s also useful in the sense that you can armbar in a wide variety of positions, with each position driving different ranges of motion:
- Supine: Increases shoulder internal rotation and lateral ribcage expansion
- Incline: Further drives shoulder internal rotation and flexion (could improve external rotation pending the degree of shoulder flexion I.e. higher)
- Decline: Increases shoulder external rotation
- Sidelying: Increases shoulder external rotation, horizontal abduction, trunk rotation, cervical rotation, and lateral ribcage compression
The most common variations, and the ones we will be going over today are the supine and sidelying versions.
The keys to performing the kettlebell armbar
To maximize the efficacy and work your muscles like a boss, you need to have your form on point!
The key things we have to have in an effective armbar are as follows:
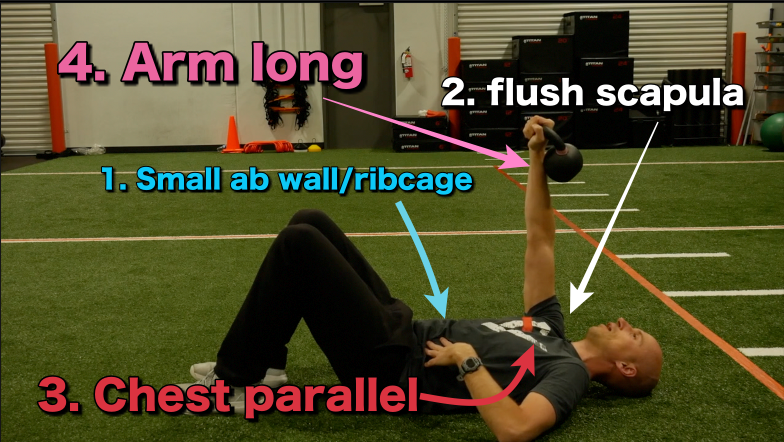
- Ab wall and lower ribcage smaller (should be flush up against one another (achieved via a full exhale)
- Shoulder blade is flush against the ribcage
- Chest parallel to the ceiling (no crunching/bending)
- Reach arm as long as possible
- Imagine giving knuckles to the ceiling
When you don’t have these pieces in place, it will limit the ribcage expansion that we oh so desire with this move. The ability to restore segmental motion between the ribs is necessary to improve upper quadrant range of motion. These pieces will help you with that.
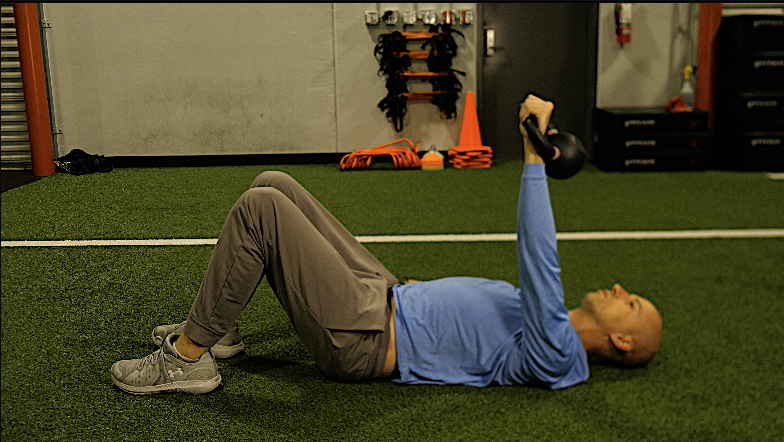
Here are the steps that I coach to perform an excellent armbar:
- Subtly tuck the hips
- Exhale softly and fully
- Reach your arm towards the ceiling slowly, as if someone was gently pulling your arm toward the ceiling
- Hold position and breathe through the nose, keeping whatever ab tension you acquired during the exhale
Common faults of the kettlebell armbar
While the steps listed above will make your kettlebell armbar rockstar status, it’s more difficult than it looks.
There are many ways to screw this up.
Problem: Too short of a reach
I like my rappers Too short, not my reaches. When you reach and lack a flush scapula, you limit upper body muscular activity and will get ABSOLUTELY ZERO ribcage expansion.
Solution: Reach to the ceiling and make the shoulder blade flush against the ribcage
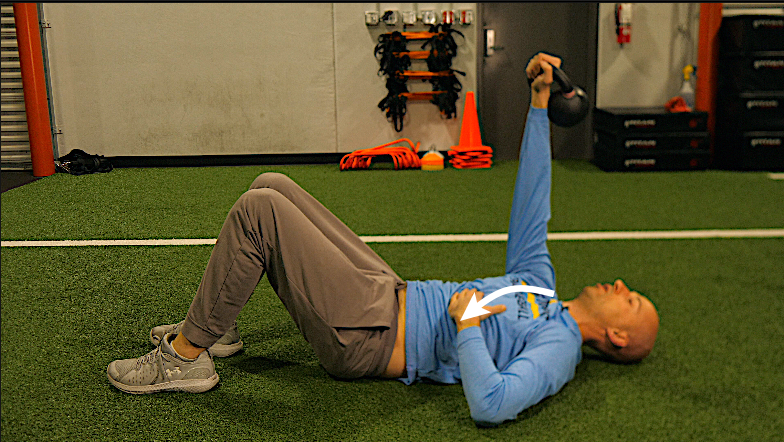
Problem: Inability to close the lower ribcage and ab wall

If your exhale is stale, then you will not get the shape change needed in the ribcage to maximize thorax dynamics.
The ab wall and lower ribcage getting smaller encourages an exhaled orientation of the thoracic diaphragm. If you maintain this and keep it slightly anchored during the movement (by maintaining a bit of ab tension gotten from the exhale), then NO ONE will mess with you.
If you can’t attain or maintain this position, then you’ll end up arching your back, sitffening up the ribcage, and getting very little out of this activity. #lame
Solution: Exhale softly and fully, letting the ab wall and lower ribcage shrink. Reaching during the exhale will assist this position
Problem: Crunching/bending the sternum
If you have some movement restrictions or reach too aggressively, it’s not uncommon to excessively crunch on the reach or let the sternum bend down.
When the sternum bends down, the pumphandle action of the ribcage can’t occur. This movement is directly related to your ability to internally rotate the shoulder. Which, uh, fam, it the point of this activity.
Instead, you’ll end up working your traps, pecs, and rectus damn-near killed us abdominis. Not what we want kicking in if we are trying to improve our movement.
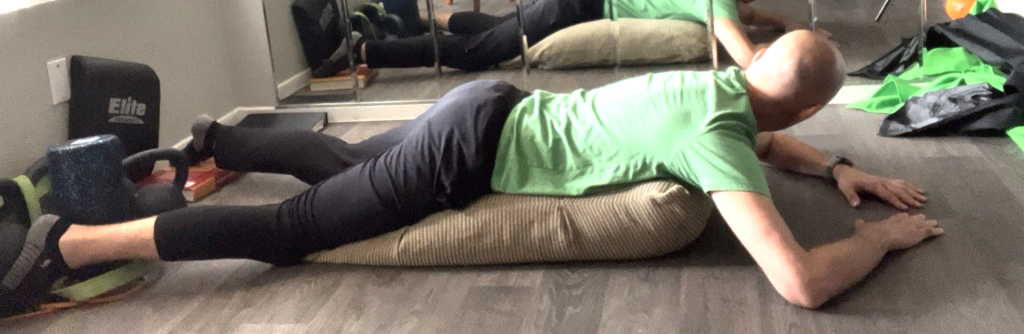
Solution: Reach with keeping the chest parallel. A slow, easy reach can help with this. If pecs kick in too much and you can’t keep this reach, try the screwdriver variation below. If that doesn’t work, you may benefit from something easier to expand the pumphandle. Something like a prone on elbows:
Problem: Your neck position is whack
Ideally, your neck should be fairly relaxed during this move, and you want your head in-line with the rest of your torso.
Sometimes, when you perform the reach, the neck will either overextend or overflex. We want something in the middle here big fam!
Solution: Place a pillow or pad underneath your head. Keep your chin away from your neck.
Adding a screwdriver to the kettlebell armbar
So you nailed the base armbar activity, and you are looking for a little sauce. I get it.
The screwdriver is like Tabasco for this activity, it really spices it up.
The screwdriver variation is useful because it allows you to both increase shoulder internal AND external rotation, which will maximize your mobility gains from this move.
Aside from the steps above, we would add these couple cues to the mix:
- Inhale – Turn entire arm to the “thumb up” position (external rotation)
- Exhale – Return the arm to the punch position (internal rotation)
The most common screwup with this move is people creating the turn through the forearm only, keeping the humerus in its original, lonesome position.
Not the kind of twist I want big fam.
Instead, you want the entire arm to turn as a unit. Your reference will be the olecranon, the pointy part of your elbow.
During the inhale, the olecranon should point downward towards the feet.
But be careful.
It’s easy to compensate for this move by downwardly rotate the scapula or even sidebending the trunk. We want the humerus to move independently of the scapula as best as possible.
Adding a head turn to the kettlebell armbar
Let’s say you want to get even wilder and crazier. Here, we can add a head turn into the mix.
The head turn is awesome because it will help promote upper thorax rotation, from T5 on up. Improving mobility in this area will help with pretty much any overhead activity.
The big key coaching wise for this is as follows:
- Inhale – Spin head towards the reaching arm (like your head was on a rotisserie)
- Exhale – Spin head back to the start position
Make sure that you do not turn your head super far, flex or sidebend your neck. We want it to be as pure of a spin as possible.
If you are feeling really frisky you can combine the head turn and screwdriver at the same time:
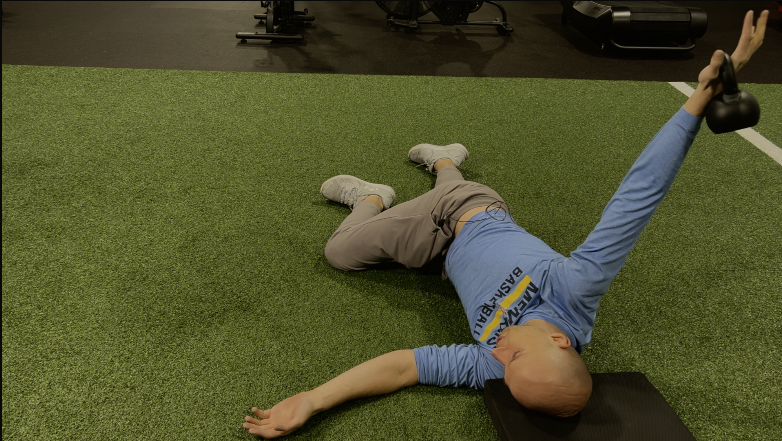
Progressing to the sidelying armbar
Once you’ve mastered the basic armbar, the sidelying armbar is your progression.
This variation, though more difficult, can provide quite a few more benefits than the supine version:
- Increase cervical and upper thoracic rotation (T5 and up)
- Improve external rotation, horizontal abduction
- Lateral ribcage compression
Here are the keys to performing this action
- Start with the supine armbar setup
- Slowly lift the ipsilateral leg up to 90 degrees of hip flexion
- Lead with the knee and turn away from the reaching side
- Reach the kettlebell towards the ceiling in the thumb up position (external rotation)
- Keep eyes fixed on the kettlebell
- Opposite palm rotates down
- Breathe
In terms of the non reaching arm, you can choose two positions:
- At 90 degrees of abduction: to drive T6-8 rotation
- Arm overhead: To further driver T5 on up rotation
Common faults of the sidelying armbar
Just like the supine armbar, peeps can easily screw up the sidleying variation as well. Here are the common faults:
Problem: Arm horizontally abducts beyond midline
The arm should stay stacked atop the thorax as you perform the roll. This position maximizes the thorax rotation we desire with this move.
Commonly, the fam will try and create this rotation by horiozntally abduction the humerus excessively. This may place undesirable load through the humerus, limiting efficacy.
Solution: Arm stacked atop the thorax
Problem: your back arches

If your back is too arched, that’s going to limit your reaching capabilities, will will affect your ability to put air into the thorax in a manner that enhances ribcage mobility.
Solution: Exhale as you roll and limit how far you reach with your knee
Problem: your neck is SUPER active
Sometimes, if you have to hold your head up during this move, your neck will have a bit too much muscular activity, likely limiting ribcage dynamics.
Solution: Rest your neck on a couple pillows. Spin your neck like it’s on a rotisserie.
Sum up
These armbar variations are immensely useful at improving upper quadrant mobility, yet they often aren’t coached as well as they could be. I hope this post makes it easier to implement these awesome moves!
To summarize:
- Armbars can improve shoulder, thorax, and cervical mobility
- Effective armbars involve low intensity reaches, full exhales, and cervicothoracic motion
- Start with supine variations, progress to sidelying variations
What have you found armbar exercises useful for? Comment below and let the fam know!