Table of Contents
A Comprehensive Foot Posture Guide
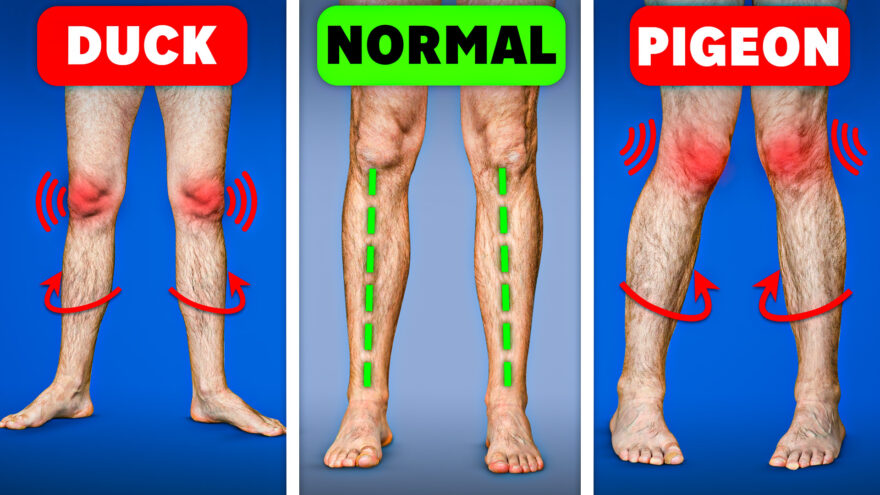
Do you ever notice someone walking with their feet turned out like a duck or turned in like a pigeon? It’s more common than you think, and it often stems from a loss of rotation somewhere in the leg. This guide will help you identify the problem and fix it with simple exercises.
Why Do Feet Turn Out or In?
When feet turn out (duck feet) or in (pigeon toes), it’s because of a loss of rotation in the leg. Here’s a breakdown:
Duck Feet: The leg favors external rotation, often because of limited internal rotation at the hip, shin, or both. These folks often have higher arches.
Pigeon Toes: The leg favors internal rotation, usually caused by limited external rotation at the hip, shin, or both. Lower arches are common.
To correct this, you need to identify the restriction and target it with the right exercises.
Step 1: Assess Your Mobility
Before jumping into exercises, determine where the problem lies. Use these tests:
External Rotation:
- Lie on your back with one knee bent and the other straight.
- Let your bent knee fall to the side without lifting the opposite hip.
- If it’s far from the ground, external rotation is limited.
Internal Rotation:
- In the same position, bring your knee across your body without twisting your back.
- If it doesn’t pass the opposite thigh, internal rotation is limited.
Standing Rotation Test:
- Stand with feet together, flat on the ground.
- Rotate your body to the left and right.
- Limited left turn = reduced left hip internal rotation and right hip external rotation.
- Limited right turn = reduced right hip internal rotation and left hip external rotation.
Arch Height Test
- Wet your foot and step on paper.
- Flat Foot: More internal tibial rotation (pigeon toes).
- High Arch: More external tibial rotation (duck feet).
Step 2: Address Global Stiffness
If all your tests were limited, you need to address overall stiffness before fixing foot posture. Think of it like trying to take off a sock while still wearing a shoe—the big restrictions must go first.
Block Decompression
What it does: Opens up space for rotation by reducing tension in the body.
Steps:
– Lie on your side and place a yoga block under your pelvis and ribcage.
– Bend your bottom hip at approximately 70 degrees.
– Position your top foot in front of the bottom ankle.
– Place your top hand on your forehead, allowing your elbow to flare slightly.
– Press your hand down gently to maintain elongation on the top side of the body.
– Take slow breaths: inhale for 5 counts, exhale for 5 counts.
– Repeat for 3 sets of 60 seconds per side.
Side-Lying Wave Roll
What it does: Teaches you to move without producing a whole lotta tension.
Steps:
– Lie on your side with a foam roller between your shins.
– Position your hips at about 70 degrees of flexion.
– Extend your arms in front of you, one hand resting atop the other.
– Slowly drag the top arm across the bottom arm, then across the chest.
– Let your upper back, then middle back, and finally hips roll backward naturally.
– Stop once your knee stops moving backward to prevent excessive lower back involvement.
– Roll back to the starting position, initiating from the knee.
– Perform for 2-3 minutes per side.
Step 3: Fixing Duck Feet
If your foot turns out, determine if the issue is at the hip or shin. Then follow the sequences below
Hip-Caused Duck Feet
These moves target improving hip internal rotation.
Crime Scene Pose
What it does: Improves hip internal rotation.
Steps:
– Lie on your stomach with one leg slightly turned outward.
– Extend your opposite arm outward with the elbow crease aligned at eye level.
– Press the inner knee, inner elbow, and base of the wrist into the ground.
– Engage the muscles at a mild intensity.
– Breathe in for 5 counts, exhale for 5 counts.
– Repeat for 3 sets of 60 seconds per side.
Swiss Ball Frog
What it does: Drives hip internal rotation into a deeper range
Steps:
– Lie on your back with your hips at 90 degrees.
– Bring your knees apart and place a Swiss ball between them.
– Keep your feet together while gently squeezing the ball with your knees
– Keep your back flat on the ground.
– Breathe deeply for 3 sets of 60 seconds.
Box Squat with Reach
What it does: Strengthens the new range of motion in a functional position.
Steps:
– Stand with feet slightly turned out, holding a weight at chest level.
– Sit back onto a box, keeping feet flat and maintaining a neutral spine.
– Exhale and reach the weight forward.
– Inhale and squat to the box.
– Exhale as you return to the standing position.
– Perform 3 sets of 10 reps.
Shin-Caused Duck Feet
Here, we will want to drive tibial internal rotation while maintaining hip external rotation.
Half-Kneeling Tibial Rotation
What it does: Improves tibial internal rotation to correct foot alignment.
Steps:
- Get into a half-kneeling stance with the back leg turned inward.
- Place your hands on your shin and twist it inward without letting the foot tip.
- Maintain this twist while pushing your knee forward over the center of your foot.
- Slowly return to the start position.
- Perform 3 sets of 10 reps per side.
Band-Resisted Tibial Rotation
What it does: Strengthens shin control in a functional position.
Steps:
- Lie on your back with a resistance band wrapped around your knees.
- Press your feet flat into the ground without tipping the foot.
- Maintain gentle pressure into the band while stabilizing your pelvis. Slowly breathe during
- Hold for 3 sets of 60 seconds.
Split Squat with Tibial Twist
What it does: Builds endurance and stability for tibial alignment.
Steps:
- Perform a split squat while pressing the outer knee into a foam roller against a wall.
- Make sure the foot stays flat
- Hold for 3 sets of 60 seconds per side.
Step 4: Fixing Pigeon Toes
If your foot turns in, determine if the issue is at the hip or shin.
If Hip External Rotation is Limited:
Hooklying Breathing
What it does: Improves hip external rotation.
Steps:
- Lie on your back with a foam roller between your knees.
- Keep your legs aligned straight with feet flat on the ground.
- Press your feet straight down while engaging your hamstrings.
- Perform 3 sets of 60 seconds.
Supine Frog Breathing
What it does: Reinforces hip external rotation in a deeper position.
Steps:
- Lie on your back in a 90/90 position
- Feet together, knees apart
- Reach at 110º shoulder flexion with the palms up
- Perform slow breaths
- Hold for 3 sets of 60 seconds per side.
Foam Roller Wall Squat
What it does: Reinforces hip external rotation in a functional, weight-bearing position.
Steps:
- Stand against a wall with a foam roller positioned at your lower back.
- Hold a weight in front and lower into a controlled squat.
- Keep feet flat, knees tracking over toes, and move slowly.
- Return to standing, engaging external hip rotation throughout.
- Keep it above parallel.
- Perform 3 sets of 10 reps.
If Tibial External Rotation is Limited
Here, we need to drive tibial external rotation while performing hip internal rotation
Standing Tibial Rotation
What it does: Encourages proper shin rotation.
Steps:
- Stand with your foot flat, grab your shin, and twist it outward.
- Grab your femur, and twist it inward
- Step backward while maintaining the rotation.
- Keep the foot flat
- Return to the start position.
- Perform 3 sets of 10 reps.
Flutter Kicks for Tibial Control
What it does: Work the abs while keeping the shin in the desired position.
Steps:
- Lie on your back with hips at 90 degrees, legs straight.
- Perform controlled flutter kicks while keeping your back flat.
- Perform 3 sets of 30-60 seconds.
Split Squat with Tibial External Rotation
What it does: Drives the desired leg rotations in standing
Steps:
- Get into a split squat position
- Drop down, pressing your inner knee into a foam roller up against the wall
- Slowly breathe during.
- Perform 3 sets of 30-60 seconds.
Step 5: Combine and Progress
Spend 2-4 weeks on the exercises that match your limitations. Retest your mobility after this period. As you improve, combine the exercises into a warm-up or daily routine.
For a full-body approach, check out our advanced movement assessment guide. Combining these drills with whole-body mobility will keep you moving efficiently and pain-free.
Stay mobile. Stay strong.